
Enhances testing by enabling screenshot capturing during integration tests to validate app appearance and functionality. Integrated with Robolectric, supports visual comparison, and automates GitHub Actions workflows for reliable visual regression testing.
Make JVM Android Integration Test Visible
Screenshot testing is key to validate your app's appearance and functionality. It efficiently detects visual issues and tests the app as users would use it, making it easier to spot problems. It's quicker than writing many assert statements, ensuring your app looks right and behaves correctly.
JVM tests, also known as local tests, are placed in the test/ directory and are run on a developer's PC or CI environment. On the other hand, device tests, also known as Instrumentation tests, are written in the androidTest/ directory and are run on real devices or emulators. Device testing can result in frequent failures due to the device environment, leading to false negatives. These failures are often hard to reproduce, making them tough to resolve.
Paparazzi is a great tool for visualizing displays within the JVM. However, it's incompatible with Robolectric, which also mocks the Android framework.
Roborazzi fills this gap. It integrates with Robolectric, allowing tests to run with Hilt and interact with components. Essentially, Roborazzi enhances Paparazzi's capabilities, providing a more efficient and reliable testing process by capturing screenshots with Robolectric.
Leveraging Roborazzi in Test Architecture: An Example
Integrating Roborazzi into the Architecture: An Example from DroidKaigi 2023 App
In the DroidKaigi 2023 app, Roborazzi was introduced from the early stages of development as part of the architectural design. This integration allowed the team to verify changes throughout the development process. The specific architectural decisions and how they were implemented can be found README.
Roborazzi ships its documentation as an installable agent skill. Running the following command installs the docs into your AI coding agent (Claude Code, Cursor, Codex, Android Studio Agent Mode, Antigravity, Gemini CLI, etc.), so the agent can look up Roborazzi setup and usage while working on your project:
npx skills add takahirom/roborazziAvailable on Maven Central.
This is an example of adding Robolectric to your project: https://github.com/takahirom/roborazzi-usage-examples/compare/b697...5c12
This library is dependent on Robolectric. Please see below to add Robolectric.
https://robolectric.org/getting-started/
This is an example of adding Roborazzi to your project: https://github.com/takahirom/roborazzi-usage-examples/commit/3a02
To take screenshots, please use Robolectric 4.10 alpha 1 or later and please
add @GraphicsMode(GraphicsMode.Mode.NATIVE) to your test class.
@GraphicsMode(GraphicsMode.Mode.NATIVE)Roborazzi is available on maven central.
This plugin simply creates Gradle tasks record, verify, compare and passes the configuration to the test.
build.gradle.kts
| plugins | buildscript |
|
Define plugin in root build.gradle.kts plugins {
...
id("io.github.takahirom.roborazzi") version "[version]" apply false
}Apply plugin in module build.gradle.kts plugins {
...
id("io.github.takahirom.roborazzi")
} |
root build.gradle.kts buildscript {
dependencies {
...
classpath("io.github.takahirom.roborazzi:roborazzi-gradle-plugin:[version]")
}
}module build.gradle.kts plugins {
...
id("io.github.takahirom.roborazzi")
} |
| plugins | buildscript |
|
Define plugin in root build.gradle plugins {
...
id "io.github.takahirom.roborazzi" version "[version]" apply false
}Apply plugin in module build.gradle plugins {
...
id 'io.github.takahirom.roborazzi'
} |
root build.gradle buildscript {
dependencies {
...
classpath "io.github.takahirom.roborazzi:roborazzi-gradle-plugin:[version]"
}
}module build.gradle apply plugin: "io.github.takahirom.roborazzi" |
| Description | Dependencies |
|---|---|
| Core functions | testImplementation("io.github.takahirom.roborazzi:roborazzi:[version]") |
| Jetpack Compose | testImplementation("io.github.takahirom.roborazzi:roborazzi-compose:[version]") |
| JUnit rules | testImplementation("io.github.takahirom.roborazzi:roborazzi-junit-rule:[version]") |
| Use Roborazzi task | Use default unit test task | Description |
|
|
or
|
Record a screenshot |
|
|
or
|
Review changes made to an image. This action will
compare the current image with the saved one, generating a comparison image labeled
as |
|
|
or
|
Validate changes made to an image. If there is any difference between the current image and the saved one, the test will fail. |
|
|
or
|
This task will first verify the images and, if differences are detected, it will record a new baseline. |
|
|
This is not a test task. |
Note: This is an experimental task. This task will clear the saved images. This task also deletes the cached images. Please be careful when using this task. |
The comparison image, saved as [original]_compare.png, is shown below:
You can check the test report in build/reports/roborazzi/index.html
This uses JetNew from Compose Samples. You can check the pull request introducing Roborazzi to the compose-samples here.
Roborazzi uses module/build/outputs/roborazzi as the default directory for reference images and comparison images. You can customize these paths in your build.gradle file:
roborazzi {
  // Directory for reference images
  outputDir.set(file("src/screenshots"))
  // Directory for comparison images (Experimental option)
  compare {
    outputDir.set(file("build/outputs/screenshots_comparison"))
  }
}
[!NOTE] By default, when you use
captureRoboImage("image.png"), the image will be saved asmodule/image.png.
You can customize the file path strategy for the recorded image. The default strategy isrelativePathFromCurrentDirectory. If you selectrelativePathFromRoborazziContextOutputDirectory, the file will be saved in the output directory specified byroborazzi.outputDir.
This can be configured in yourgradle.propertiesfile:roborazzi.record.filePathStrategy=relativePathFromRoborazziContextOutputDirectory
By default, every Roborazzi task shares a single output directory (build/outputs/roborazzi) and a single intermediate directory (build/intermediates/roborazzi). When multiple Roborazzi test tasks run in a single Gradle invocation (for example check, or Kotlin Multiplatform's allTests), their directory reads and writes can race with each other. On Gradle 9 this can hard-fail with Cannot access input property 'roborazziImageInput' (see #830).
Enabling separateOutputDirs gives each task slug its own subdirectory, so the tasks never share a directory:
roborazzi {
  // Experimental
  separateOutputDirs.set(true)
}
The unit of separation is the recordRoborazzi<Slug> slug:
build/outputs/roborazzi/debug/, build/outputs/roborazzi/release/.build/outputs/roborazzi/desktop/.The intermediate directory is separated the same way (e.g. build/intermediates/roborazzi/debug/). If you set a custom outputDir, the per-slug subdirectory is created under it.
[!IMPORTANT] Enabling this option changes where golden images are stored. Existing users must re-record (or manually move) their goldens into the new per-slug subdirectory, otherwise verification will not find them. This is opt-in and defaults to
false, so existing behavior is unchanged unless you enable it.This also partially addresses requests for per-flavor/variant subdirectories (#804, #731).
You can take a screenshot by calling captureRoboImage().
app/src/test/java/../ManualTest.kt
import androidx.compose.ui.test.junit4.createAndroidComposeRule
import androidx.test.core.app.ActivityScenario
import androidx.test.espresso.Espresso.onView
import androidx.test.ext.junit.runners.AndroidJUnit4
import org.junit.Test
import org.junit.runner.RunWith
import org.robolectric.annotation.GraphicsMode

// All you need to do is use the captureRoboImage function in the test!
import com.github.takahirom.roborazzi.captureRoboImage


// Tips: You can use Robolectric while using AndroidJUnit4
@RunWith(AndroidJUnit4::class)
// Enable Robolectric Native Graphics (RNG)
@GraphicsMode(GraphicsMode.Mode.NATIVE)
class ManualTest {
  @get:Rule
  val composeTestRule = createAndroidComposeRule<MainActivity>()

  @Test
  fun captureRoboImageSample() {
    // Tips: You can use Robolectric with Espresso API
    // launch
    ActivityScenario.launch(MainActivity::class.java)

    // Capture screen
    onView(ViewMatchers.isRoot())
      // If you don't specify a screenshot file name, Roborazzi will automatically use the method name as the file name for you.
      // The format of the file name will be as follows:
      // build/outputs/roborazzi/com_..._ManualTest_captureRoboImageSample.png
      .captureRoboImage()

    // Capture Jetpack Compose Node
    composeTestRule.onNodeWithTag("AddBoxButton")
      .onParent()
      .captureRoboImage("build/compose.png")
  }
}
Roborazzi supports the following APIs.
| Capture | Code |
| ✅ Jetpack Compose's onNode() |
composeTestRule.onNodeWithTag("AddBoxButton")
.captureRoboImage() |
| ✅ Espresso's onView() |
onView(ViewMatchers.isRoot())
.captureRoboImage()onView(withId(R.id.button_first))
.captureRoboImage() |
| ✅ View |
val view: View = composeTestRule.activity.findViewById<View>(R.id.button_second)
view.captureRoboImage() |
| ✅ Jetpack Compose lambda |
captureRoboImage() {
  Text("Hello Compose!")
} |
|
Experimental🧪 ✅ Captures the entire screen, including dialogs |
captureScreenRoboImage() |
| ✅ Bitmap |
val bitmap: Bitmap = createBitmap(100, 100, Bitmap.Config.ARGB_8888)
  .apply {
    applyCanvas {
      drawColor(android.graphics.Color.YELLOW)
    }
  }
bitmap.captureRoboImage() |
You can configure the device by using the @Config annotation and RobolectricDeviceQualifiers.
| Configuration | Code |
| ✅ Predefined device configuration |
You can change the device configuration by adding @RunWith(AndroidJUnit4::class)
@GraphicsMode(GraphicsMode.Mode.NATIVE)
@Config(qualifiers = RobolectricDeviceQualifiers.Pixel5)
class RoborazziTest {@Test
@Config(qualifiers = RobolectricDeviceQualifiers.Pixel5)
fun test() { |
| ✅ Night mode |
@Config(qualifiers = "+night") |
| ✅ Locale |
@Config(qualifiers = "+ja") |
| ✅ Screen size |
@Config(qualifiers = RobolectricDeviceQualifiers.MediumTablet) |
See Integrate to your GitHub Actions for CI workflows that store, verify, and compare screenshots.
RoborazziRule is a JUnit rule for Roborazzi.
RoborazziRule is optional. You can use captureRoboImage() without this rule.
RoborazziRule has two features.
RoborazziOptions and outputDirectoryPath etc for captureRoboImage().For example, The following code generates an output file
named **custom_outputDirectoryPath**/**custom_outputFileProvider**-com.github.takahirom.roborazzi.sample.RuleTestWithPath.captureRoboImage.png :
@RunWith(AndroidJUnit4::class)
@GraphicsMode(GraphicsMode.Mode.NATIVE)
class RuleTestWithPath {
  @get:Rule
  val roborazziRule = RoborazziRule(
    options = Options(
      outputDirectoryPath = "$DEFAULT_ROBORAZZI_OUTPUT_DIR_PATH/custom_outputDirectoryPath",
      outputFileProvider = { description, outputDirectory, fileExtension ->
        File(
          outputDirectory,
          "custom_outputFileProvider-${description.testClass.name}.${description.methodName}.$fileExtension"
        )
      }
    ),
  )

  @Test
  fun captureRoboImage() {
    launch(MainActivity::class.java)
    // The file will be saved using the rule's outputDirectoryPath and outputFileProvider
    onView(isRoot()).captureRoboImage()
  }
}
To record test interactions as animated images (captureRoboGif(), recordRoboVideo()),
see Capture GIFs and videos.
RoborazziRule.Options has:
captureType — what the rule captures per test: None (default; the rule only provides
context), LastImage, AllImage (an image per layout change, like TestClass_method_0.png),
or Gif. The image-generating types take onlyFail = true to capture only when the test
fails. Annotate a test with @RoborazziRule.Ignore to exclude it from these capture types.outputDirectoryPath / outputFileProvider — where output files go and how they are named.roborazziOptions — the RoborazziOptions provided to captureRoboImage() in the test.See RoborazziRule for the full definition.
When comparing images, you may encounter differences due to minor changes related to antialiasing. You can use the options below to avoid this.
@get:Rule
val roborazziRule = RoborazziRule(
    options = RoborazziRule.Options(
        roborazziOptions = RoborazziOptions(
            compareOptions = RoborazziOptions.CompareOptions(
                changeThreshold = 0.01, // For 1% accepted difference
                imageComparator = SimpleImageComparator(
                    maxDistance = 0.007F, // 0.001F is default value from Differ
                    vShift = 2, // Increasing the shift can help resolve antialiasing issues
                    hShift = 2 // Increasing the shift can help resolve antialiasing issues
                )
            )
        )
    )
)You can set roborazzi.record.image.extension to webp in your gradle.properties file to generate WebP images.
roborazzi.record.image.extension=webpWebP is a lossy image format by default, which can make managing image differences challenging. To address this, we provide a lossless WebP image comparison feature.
To enable WebP support, add testImplementation("io.github.darkxanter:webp-imageio:0.3.3") to your build.gradle.kts file.
onView(ViewMatchers.withId(R.id.textview_first))
  .captureRoboImage(
    roborazziOptions = RoborazziOptions(
      recordOptions = RoborazziOptions.RecordOptions(
        imageIoFormat = LosslessWebPImageIoFormat(),
      ),
    )
  )
You can also use other image formats by implementing your own AwtImageWriter and AwtImageLoader.
data class JvmImageIoFormat(
  val awtImageWriter: AwtImageWriter,
  val awtImageLoader: AwtImageLoader
) : ImageIoFormatIf you are having trouble debugging your test, try Dump mode as follows.
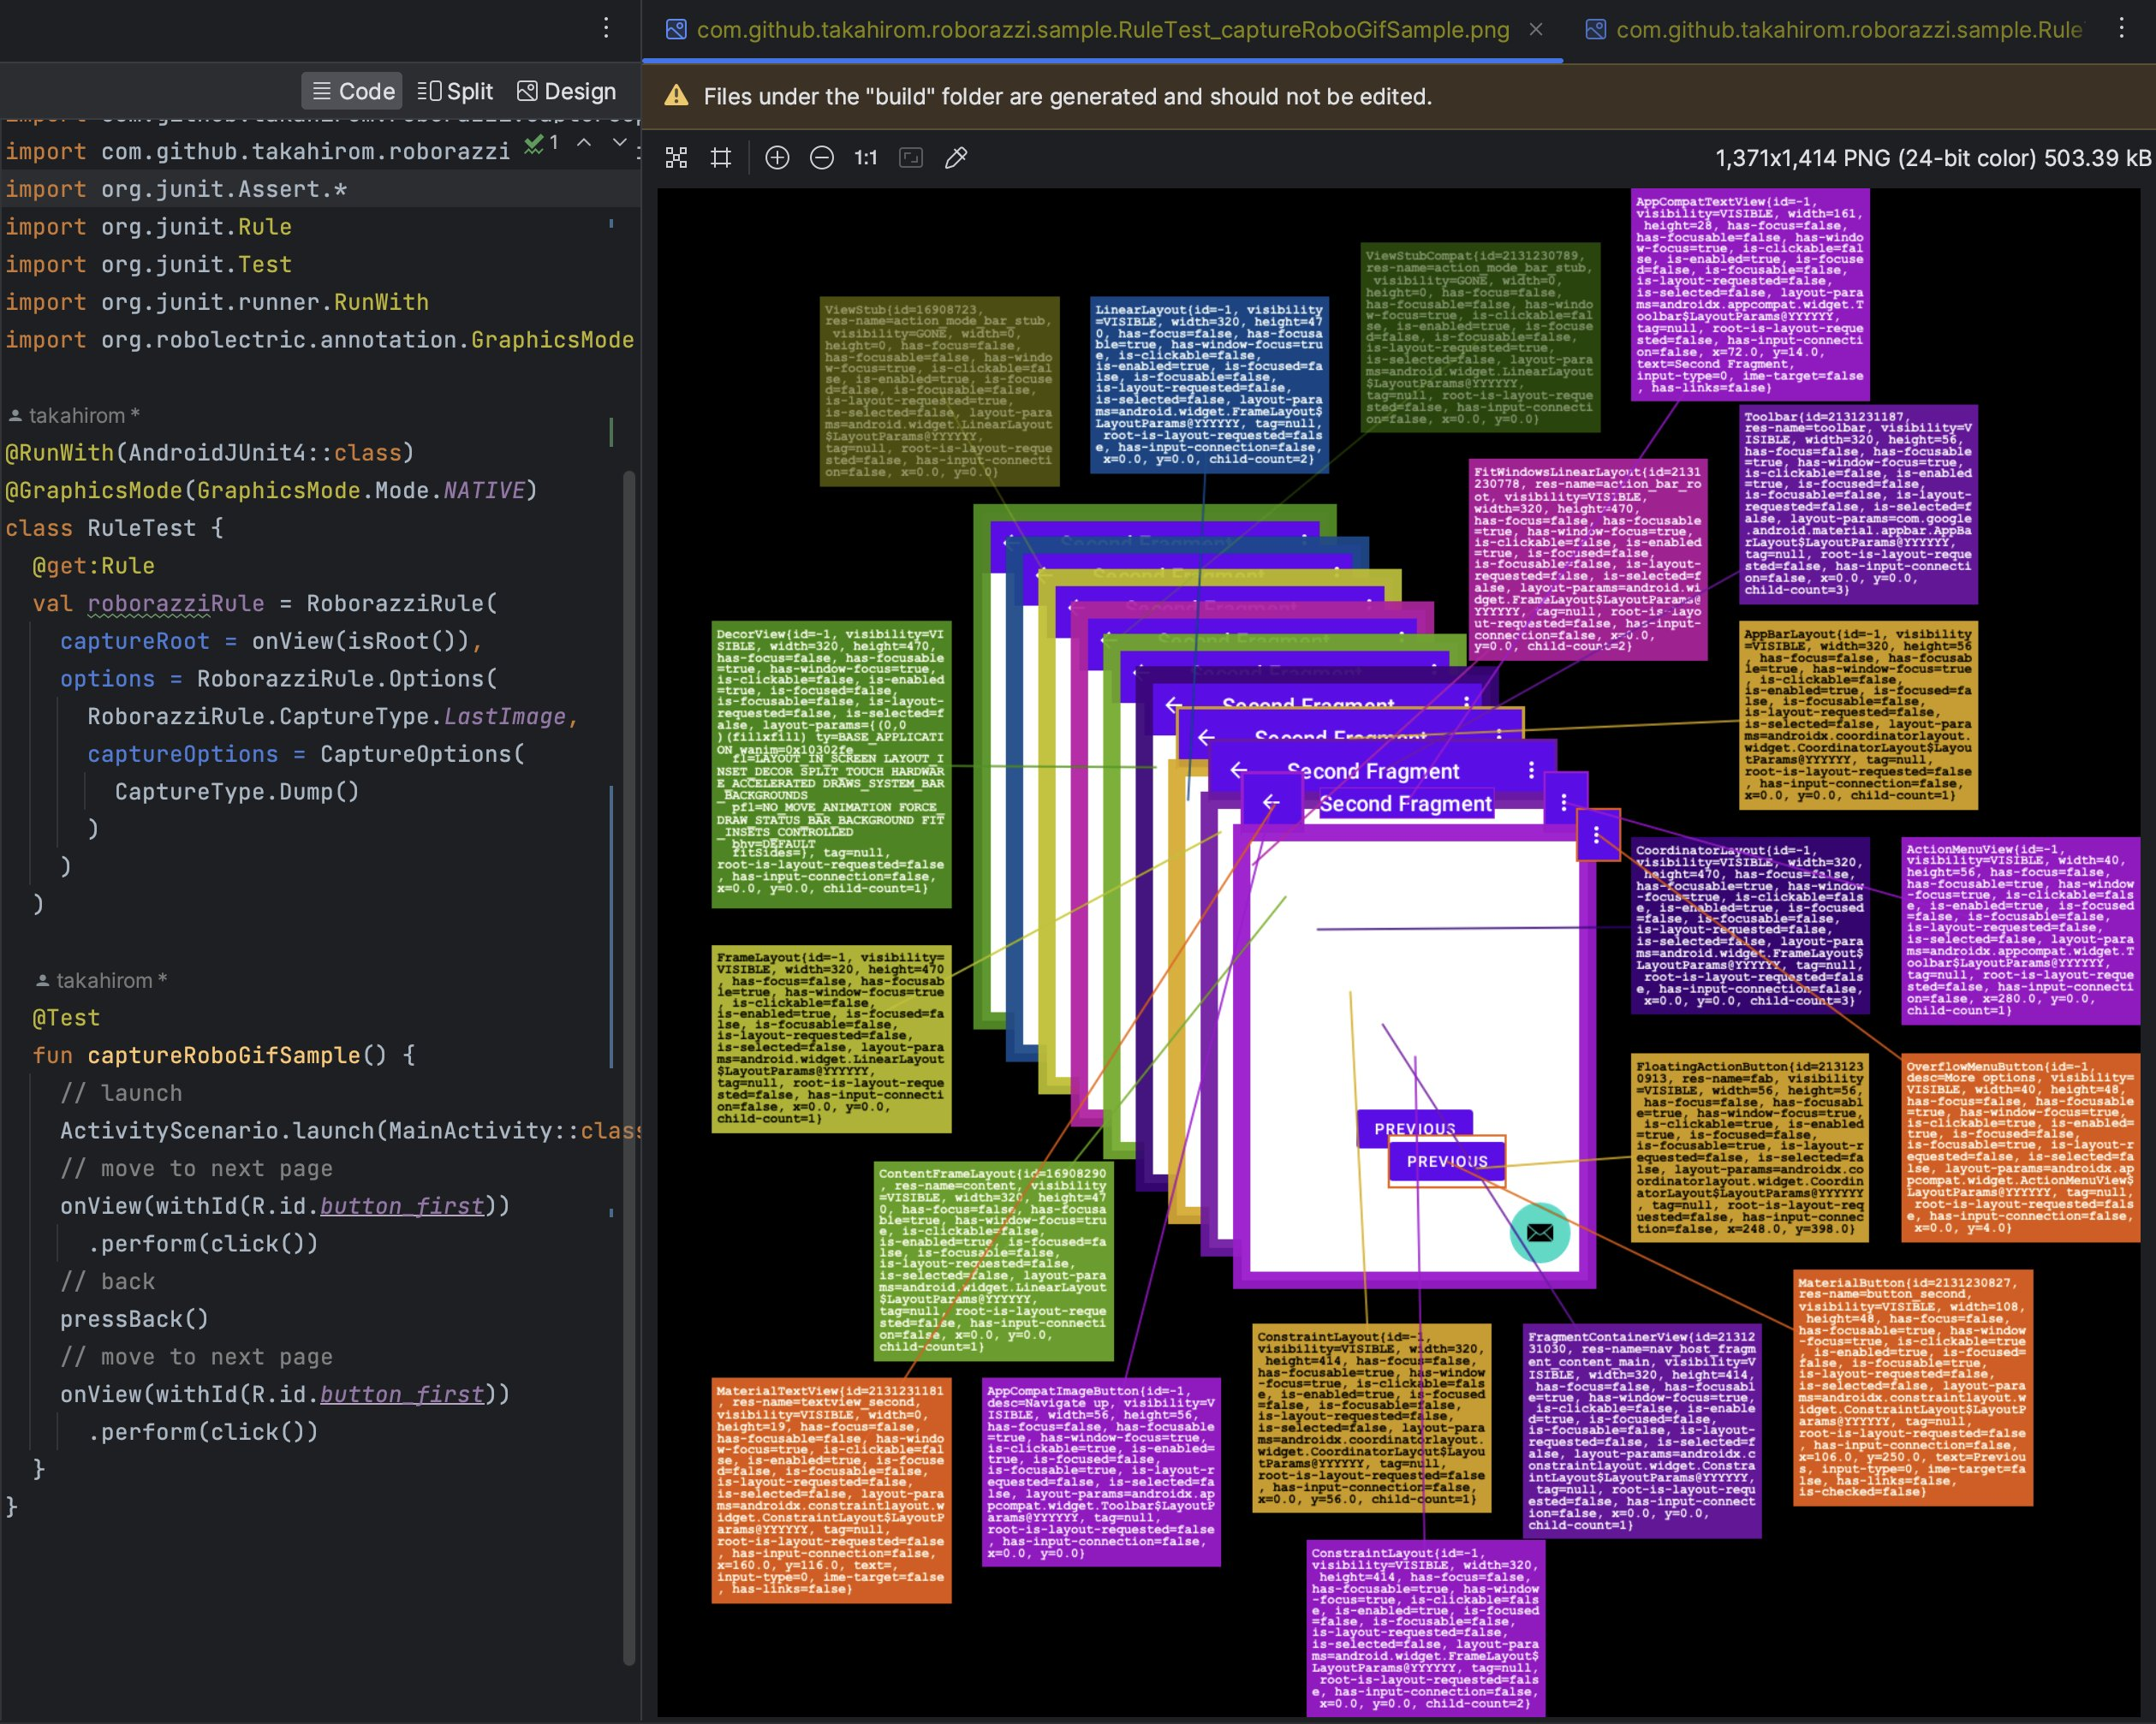
For a machine-readable version of the UI tree for tools and AI agents, see UI tree dump (JSON).
Roborazzi Accessibility Checks is a library that integrates accessibility checks into Roborazzi. Please refer to Accessibility Check
Please check out RoborazziOptions for available Roborazzi options.
While Dump mode
renders the UI tree into an image for humans, UI tree dump writes a
machine-readable JSON sidecar next to the screenshot it describes, for tools
and AI agents to read. When enabled, capturing MyTest.png also writes
MyTest.uitree.json (the Compose semantics + View hierarchy of the current run)
and, by default, an annotated MyTest.annotated.png (see
Annotated image below).
The sidecar is written on record and compare/verify, next to the image the task
writes: MyTest.uitree.json on record, and MyTest_actual.uitree.json in the
compare output directory on compare/verify (an unchanged verify still writes it).
The sidecar is informational only: it never participates in image diffing and
never fails verification. Bitmap-based captureRoboImage(Bitmap...) captures
(which have no component tree) do not produce one.
Supported on Android/Robolectric, Compose Desktop, and Compose iOS, with identical output.
Via the Gradle property (no code change):
./gradlew recordRoborazziDebug -Proborazzi.dumpUiTree=trueOr per capture via RoborazziOptions:
onView(ViewMatchers.isRoot())
  .captureRoboImage(
    roborazziOptions = RoborazziOptions(
      uiTreeDumpOptions = UiTreeDumpOptions()
    )
){ "schemaVersion": 1, "capture": { "imageWidth": 220, "imageHeight": 100, "scale": 1.0 }, "root":
{ "type": "view", "className": "androidx.compose.ui.platform.ComposeView", "bounds": [0, 0, 220, 100], "children": [
{ "n": 1, "type": "compose", "testTag": "login_button", "bounds": [16, 24, 204, 72], "properties": { "Role": "Button", "Text": "Login" }, "actions": ["OnClick"], "flags": ["MergeDescendants"] },
{ "n": 2, "type": "compose", "bounds": [16, 80, 204, 96], "properties": { "Text": "Forgot password?" } } ] }
}The format is deliberately grep-first: one node per line with all of its scalar
attributes, so a single grep finds a node and its coordinates.
bounds is [left, top, right, bottom] in RAW (unscaled) window pixel
coordinates; the root capture object carries the output imageWidth/
imageHeight and scale. Map to image pixels with
image = (raw − root.bounds origin) × capture.scale — the root origin is
0, 0 for full-screen captures.visibility when the
node is visible).n is a sequential (1-based, pre-order) number on annotatable nodes only —
visible nodes with a test tag, a Text/ContentDescription, or an action; a
numbered MergeDescendants node's descendants are skipped."Set-of-Mark" refers to a prompting technique for vision-language models: overlaying numbered marks on image regions lets a model refer to a region unambiguously by its number (Yang et al., 2023).
Written by default next to the screenshot — a copy of the output with every
numbered node drawn as a labelled box — under the same naming as the sidecar:
MyTest.annotated.png on record, MyTest_actual.annotated.png on compare/verify
(an unchanged verify annotates the identical golden).
Each box's number is the same n as in the JSON, so an agent can point at
"element #3" and look up "n": 3 for its exact bounds, properties, and actions.
The annotated image is a display artifact of the current run only — never
compared, never failing a capture, never treated as a golden. Opt out with
UiTreeDumpOptions(annotateImage = false).
AI agents are bad at judging small layout changes from screenshots — ask one to "add margin above the button" and it will often claim "fixed" when nothing moved. The deterministic UI tree gives it exact coordinates to check instead, so the agent can read the button's bounds before and after and prove the change actually landed.
Record and read the node line:
./gradlew recordRoborazziDebug -Proborazzi.dumpUiTree=true
grep login_button build/outputs/roborazzi/MyTest.uitree.json
#  { "n": 1, "testTag": "login_button", "bounds": [16, 24, 204, 72], ... }
bounds is [left, top, right, bottom], so the top edge is at 24.
Make the change, keeping that before value in context.
Re-record (it overwrites the sidecar in place) and grep the same line:
# { "n": 1, "testTag": "login_button", "bounds": [16, 32, 204, 80], ... }
Top moved 24 → 32 — the button provably sits 8px lower. (To prove a gap,
also compare the sibling above: its bottom vs this top.) Because the output
is deterministic, any change in the numbers is a real layout change, not noise.
It is easy to integrate Roborazzi to your GitHub Actions.
name: store screenshots

on:
  push

env:
  GRADLE_OPTS: "-Dorg.gradle.jvmargs=-Xmx6g -Dorg.gradle.daemon=false -Dkotlin.incremental=false"

jobs:
  test:
    runs-on: macos-latest

    steps:
      - uses: actions/checkout@v4
      - uses: actions/setup-java@v4
        with:
          distribution: 'zulu'
          java-version: 19

      - name: Setup Gradle
        uses: gradle/actions/setup-gradle@v4

      - name: test
        run: |
          # Create screenshots
          ./gradlew app:recordRoborazziDebug --stacktrace

      # Upload screenshots to GitHub Actions Artifacts
      - uses: actions/upload-artifact@v4
        with:
          name: screenshots
          path: app/build/outputs/roborazzi
retention-days: 30name: verify test
on:
push
env:
GRADLE_OPTS: "-Dorg.gradle.jvmargs=-Xmx6g -Dorg.gradle.daemon=false -Dkotlin.incremental=false"
jobs:
test:
runs-on: macos-latest
steps:
- uses: actions/checkout@v4
- uses: actions/setup-java@v4
with:
distribution: 'zulu'
java-version: 19
- name: Setup Gradle
uses: gradle/actions/setup-gradle@v4
# Download screenshots from main branch
- uses: dawidd6/action-download-artifact@v6
with:
name: screenshots
path: app/build/outputs/roborazzi
workflow: test.yaml
branch: main
- name: verify test
id: verify-test
run: |
# If there is a difference between the screenshots, the test will fail.
./gradlew app:verifyRoborazziDebug --stacktrace
- uses: actions/upload-artifact@v4
if: ${{ always() }}
with:
name: screenshot-diff
path: app/build/outputs/roborazzi
retention-days: 30
- uses: actions/upload-artifact@v4
if: ${{ always() }}
with:
name: screenshot-diff-reports
path: app/build/reports
retention-days: 30
- uses: actions/upload-artifact@v4
if: ${{ always() }}
with:
name: screenshot-diff-test-results
path: app/build/test-results
retention-days: 30
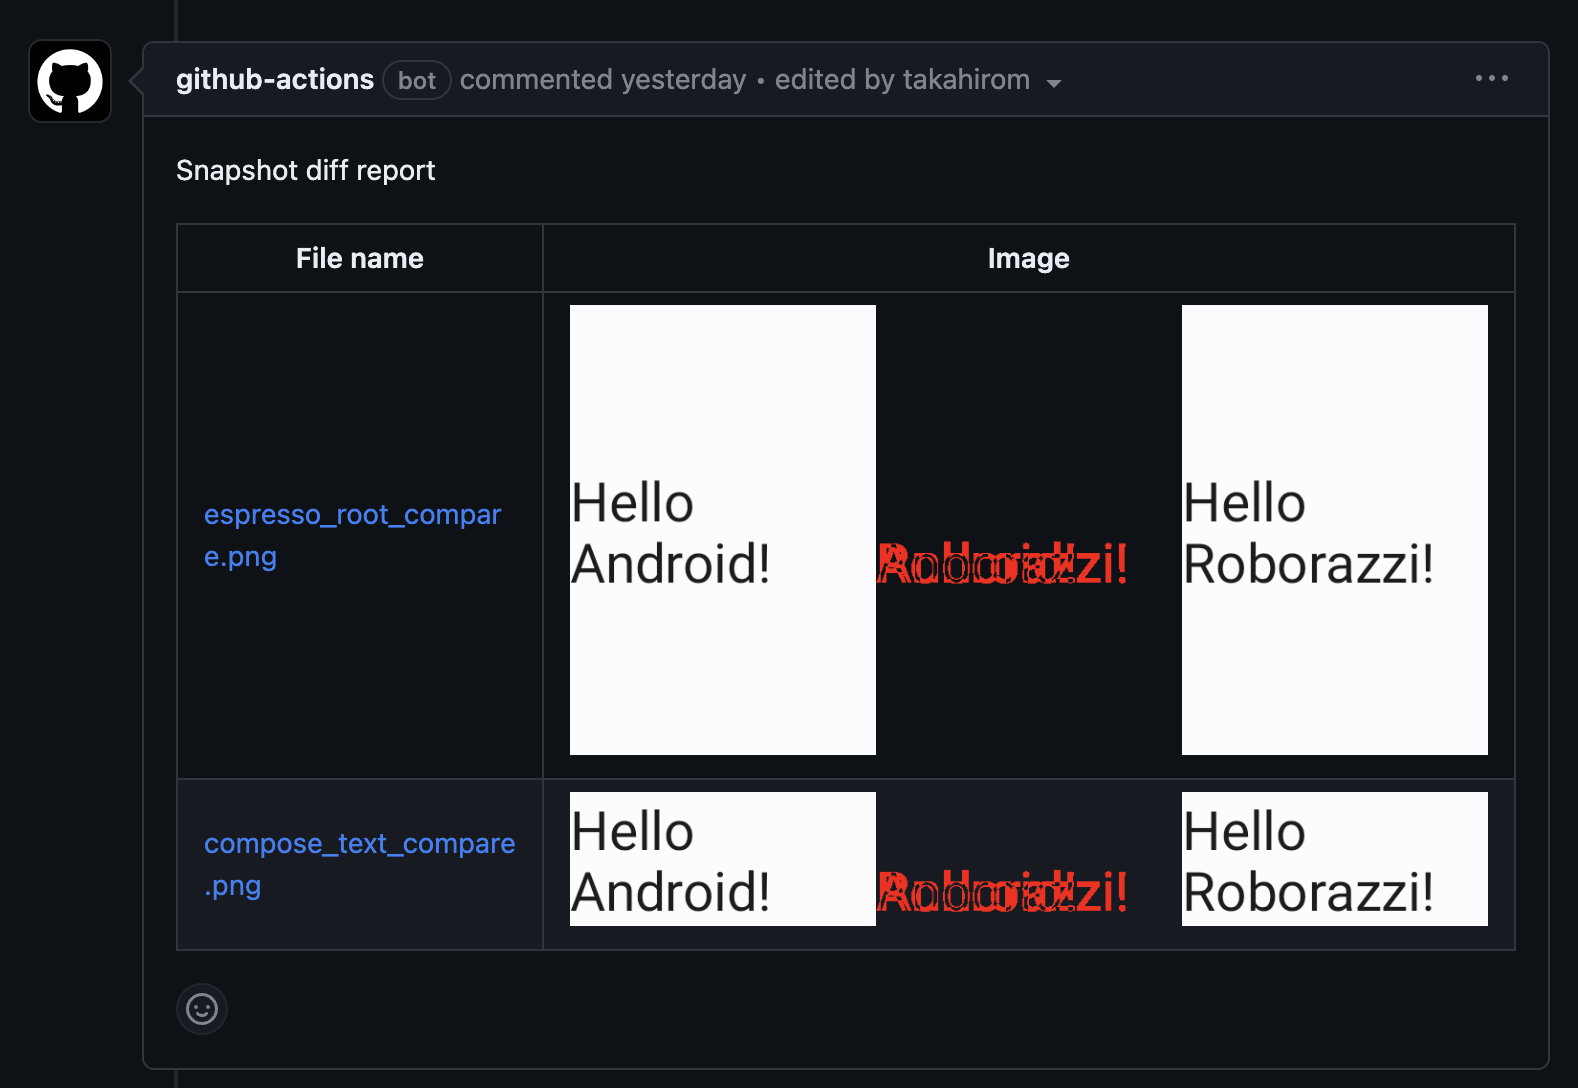
For those who are looking for a more advanced example, we have prepared a sample repository that demonstrates how to use Roborazzi to compare snapshot results on GitHub pull requests. This sample showcases the integration of Roborazzi with GitHub Actions workflows, making it easy to visualize and review the differences between snapshots directly in the pull request comments.
Check out the roborazzi-compare-on-github-comment-sample repository to see this powerful feature in action and learn how to implement it in your own projects.
Example of the comment
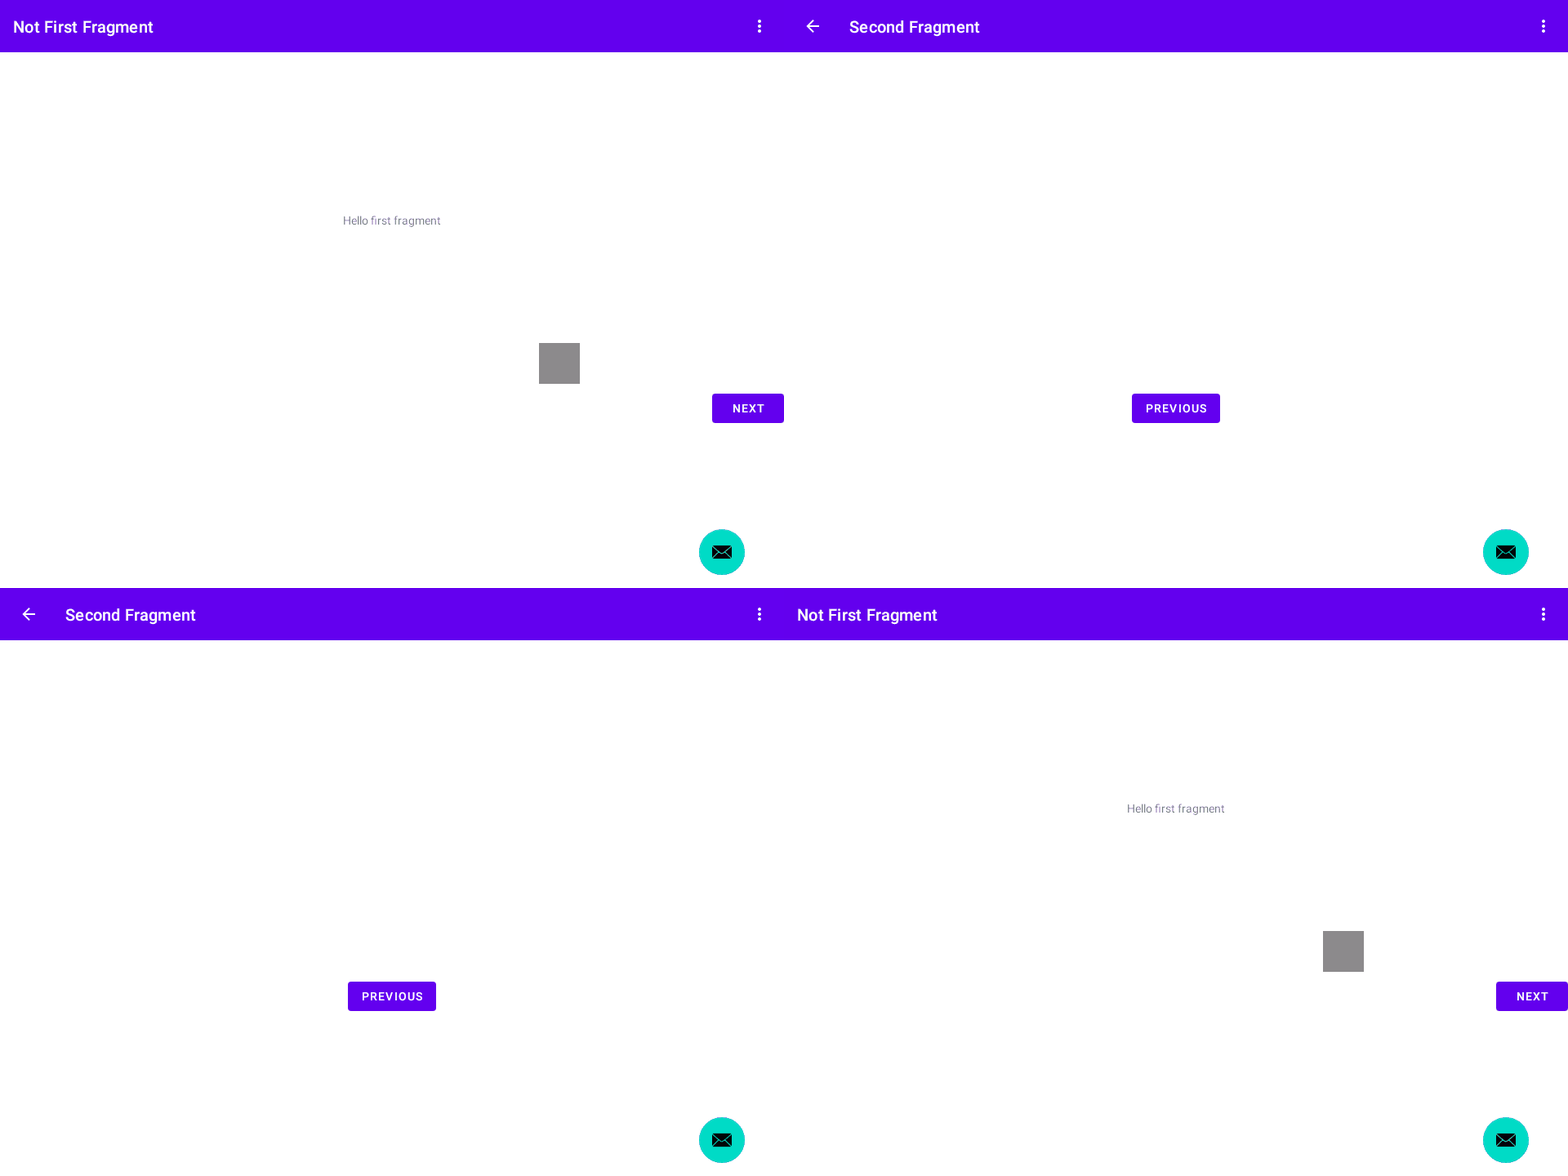
Roborazzi can record test interactions as animated images: captureRoboGif()
captures visually distinct states as a GIF, and recordRoboVideo() records
animations frame by frame over virtual time.
@Test
fun captureRoboGifSample() {
  onView(ViewMatchers.isRoot())
    .captureRoboGif("build/test.gif") {
      // launch
      ActivityScenario.launch(MainActivity::class.java)
      // move to next page
      onView(withId(R.id.button_first))
        .perform(click())
      // back
      pressBack()
      // move to next page
      onView(withId(R.id.button_first))
        .perform(click())
    }
}
Note
You don't need to use RoborazziRule if you're using captureRoboGif().
With the JUnit test rule, you do not need to name the gif image, and if you prefer, you can output the gif image only if the test fails.
This test will output this file.
build/outputs/roborazzi/com.github.takahirom.roborazzi.sample.RuleTestWithOnlyFail_captureRoboGifSampleFail.gif
@RunWith(AndroidJUnit4::class)
@GraphicsMode(GraphicsMode.Mode.NATIVE)
class RuleTestWithOnlyFail {
  @get:Rule
  val roborazziRule = RoborazziRule(
    captureRoot = onView(isRoot()),
    options = Options(
      captureType = RoborazziRule.CaptureType.Gif(
        onlyFail = true
      ),
    )
  )

  @Test
  fun captureRoboGifSampleFail() {
    // launch
    ActivityScenario.launch(MainActivity::class.java)
    // move to next page
    onView(withId(R.id.button_first))
      .perform(click())
    // should fail because the button does not exist
    // Due to failure, the gif image will be saved in the outputs folder.
    onView(withId(R.id.button_first))
      .perform(click())
  }
}Test target
@Composable
fun SampleComposableFunction() {
  var count by remember { mutableStateOf(0) }
  Column(
    Modifier
      .size(300.dp)
  ) {
    Box(
      Modifier
        .testTag("AddBoxButton")
        .size(50.dp)
        .clickable {
          count++
        }
    )
    (0..count).forEach {
      Box(
        Modifier
          .size(30.dp)
      )
    }
  }
}
Test (Just add RoborazziRule)
@RunWith(AndroidJUnit4::class)
@GraphicsMode(GraphicsMode.Mode.NATIVE)
class ComposeTest {
  @get:Rule
  val composeTestRule = createAndroidComposeRule<ComponentActivity>()

  @get:Rule
  val roborazziRule = RoborazziRule(
    composeRule = composeTestRule,
    captureRoot = composeTestRule.onRoot(),
    options = RoborazziRule.Options(
      RoborazziRule.CaptureType.Gif()
    )
  )

  @Test
  fun composable() {
    composeTestRule.setContent {
      SampleComposableFunction()
    }
    (0 until 3).forEach { _ ->
      composeTestRule
        .onNodeWithTag("AddBoxButton")
        .performClick()
    }
  }
}
recordRoboVideo() records how the UI evolves over virtual time -- animations, transitions,
gestures and any other time-driven change -- as an animated image that plays back in real time.
Unlike captureRoboGif(), which only records visually distinct states with a fixed 1-second
delay, it pauses the Compose main clock and drives it frame by frame, so intermediate animation
frames are captured with faithful timing. Interactions in the block run with the clock paused;
call delay() in the scope to advance virtual time while frames are recorded. After the block
returns, recording continues until the UI settles, so a block that only performs a click still
records the whole animation the click starts.
@OptIn(ExperimentalRoborazziApi::class)
@Test
fun recordVideo() {
  composeTestRule.setContent {
    AnimatedBoxContent()
  }
  composeTestRule.onNodeWithTag("root")
    .recordRoboVideo(
      composeRule = composeTestRule,
      filePath = "build/outputs/roborazzi/video.gif",
      videoOptions = RoboVideoOptions(fps = 10),
    ) {
      composeTestRule.onNodeWithTag("toggle").performClick()
      delay(300)
      composeTestRule.onNodeWithTag("toggle").performClick()
      delay(300)
    }
}RoboVideoOptions: fps (default 10), settleTimeoutMillis (additional virtual time to
keep recording while the UI is still changing after the block ends; default 3000), and
backgroundColor (ARGB fill for the fixed recording viewport when frames have different
sizes; default white)..gif produces a GIF (256 colors; the
default), .png a lossless, full-color APNG (Animated PNG) -- prefer .png when color
fidelity matters. Only these animated-image formats are supported for now; the "video" name
was chosen deliberately so real video formats (e.g. mp4) can be added later without renaming
the API.fps whose frame step
(1000 / fps) is a multiple of 10ms (e.g. 10, 20, 25, 50) for exact GIF timing. APNG encodes
the step exactly.@ExperimentalRoborazziApi) and currently only supports recording:
when the Roborazzi task runs in compare/verify mode it is a complete no-op -- the block is not
executed and no image is recorded or verified.recordScreenRoboVideo() records all window roots instead of a single node, mirroring how
captureScreenRoboImage() relates to captureRoboImage(). Prefer it when you want a stable,
device-sized viewport for every frame, or to capture window overlays such as dialogs added
mid-recording or touch/tap indicators, which live on separate window roots and are invisible to a
node-scoped recording. Usage is the same, just without node scoping:
recordScreenRoboVideo(
  composeRule = composeTestRule,
  filePath = "build/outputs/roborazzi/video_screen.gif",
  videoOptions = RoboVideoOptions(fps = 10),
) {
  composeTestRule.onNodeWithTag("toggle").performClick()
  delay(300)
}
Because the recorder idles the Robolectric main Looper in lockstep with the Compose main clock,
suspend-based gesture drivers make progress while frames are recorded. For example, you can drive
a swipe with saket/touch-robot from a LaunchedEffect,
use recordScreenRoboVideo() so the touch indicator overlay is captured, and just pump virtual
time in the block:
composeTestRule.setContent {
  // A composable whose LaunchedEffect drives a touch-robot swipe on the root.
  DraggableBoxContent()
}
recordScreenRoboVideo(
  composeRule = composeTestRule,
  filePath = "build/outputs/roborazzi/swipe.gif",
) {
  // Pump virtual time so the LaunchedEffect gesture progresses while frames are captured.
  delay(1000)
}Roborazzi provides support for generating screenshot tests and easy setup for Jetpack Compose Preview. This support uses ComposablePreviewScanner to scan the Composable Previews in your project.
You first need to add the Roborazzi plugin to your project. Please refer to the setup guide for more information.
Then you can enable the Compose Preview screenshot test generation feature by adding the following configuration to your build.gradle.kts file:
roborazzi {
  generateComposePreviewRobolectricTests {
    enable = true
  }
}
The plugin will not automatically change your settings or add dependencies to prevent conflicts with your existing setup. However, it will provide instructions on what to do next, such as adding dependencies and required code. You can also check the sample project for a complete example.
After that, you can run the recordRoborazziDebug task to generate screenshots using the generated tests, as described in the setup guide.
You can customize the generated test by adding the following configuration to your build.gradle.kts file:
roborazzi {
  @OptIn(ExperimentalRoborazziApi::class)
  generateComposePreviewRobolectricTests {
    enable = true
    // The package names to scan for Composable Previews.
    packages = listOf("com.example")
    // robolectricConfig will be passed to Robolectric's @Config annotation in the generated test class.
    // See https://robolectric.org/configuring/ for more information.
    robolectricConfig = mapOf(
      "sdk" to "[32]",
      "qualifiers" to "RobolectricDeviceQualifiers.Pixel5",
    )
    // If true, the private previews will be included in the test.
    includePrivatePreviews = true
    // The fully qualified class name of the custom test class that implements [com.github.takahirom.roborazzi.ComposePreviewTester].
    testerQualifiedClassName = "com.example.MyCustomComposePreviewTester"
    // The number of test classes to generate. Set this to match maxParallelForks for parallel test execution.
    generatedTestClassCount = 4

    // Experimental: render at a lower density to make the tests faster and the images smaller.
    // See "Making the tests faster with renderScale" below.
    // renderScale = 1.0 / 3

    // Filter previews by annotation. See "Filtering previews by annotation" below.
    annotationFilter = AnnotationFilter.Filter.RoboPreviewInclude
  }
}You can create a custom ComposePreviewTester to control the screenshot capture behavior, such as setting a custom image comparison threshold.
Note that AndroidComposePreviewTester is a final class, so you can't subclass it. Instead, use Kotlin class delegation and pass a custom Capturer to its constructor. Also, your tester class must have a parameterless constructor because the plugin instantiates it via reflection:
import com.dropbox.differ.SimpleImageComparator
import com.github.takahirom.roborazzi.*
import com.github.takahirom.roborazzi.ComposePreviewTester.TestParameter.JUnit4TestParameter.AndroidPreviewJUnit4TestParameter

@OptIn(ExperimentalRoborazziApi::class)
class MyCustomComposePreviewTester :
  ComposePreviewTester<AndroidPreviewJUnit4TestParameter> by AndroidComposePreviewTester(
    capturer = { parameter ->
      val customOptions = parameter.roborazziOptions.copy(
        compareOptions = parameter.roborazziOptions.compareOptions.copy(
          // Set custom comparison threshold (0.0 = exact match, 1.0 = ignore differences)
          imageComparator = SimpleImageComparator(maxDistance = 0.01f)
        )
      )
      AndroidComposePreviewTester.DefaultCapturer().capture(
        parameter.copy(roborazziOptions = customOptions)
      )
    }
  )
If you need to customize more than the capture behavior, such as the scan options or the test lifecycle, you can override options() or test() in the delegating class.
Options is how the Gradle extension reaches your tester: the generated test assigns the configured values to ComposePreviewTester.defaultOptionsFromPlugin, and the default options() returns them. So when you override options(), derive the result with super.options().copy(...) instead of constructing a new Options, otherwise every setting the plugin configured is silently replaced by defaults. The same applies if you implement test() or the capture yourself: read the values from options() rather than assuming defaults.
Two settings need extra care with a custom tester:
includePrivatePreviews and annotationFilter are consumed by testParameters(). Because a custom tester usually overrides it, the plugin rejects the combination unless you set useScanOptionParametersInTester = true and read options().scanOptions yourself.renderScale (see Making the tests faster with renderScale) is consumed at capture time, so the class-delegation pattern above keeps working. If you override test() yourself, see the renderScale property documentation for what to pass to preview.toRoborazziComposeOptions(renderScale). A tester that drops the value fails the generated test with an explanation, so a silently unscaled screenshot is not possible.Then reference your custom tester in the Gradle configuration:
roborazzi {
  @OptIn(ExperimentalRoborazziApi::class)
  generateComposePreviewRobolectricTests {
    enable = true
    testerQualifiedClassName = "com.example.MyCustomComposePreviewTester"
  }
}
[!NOTE] If you are using Groovy DSL instead of Kotlin DSL, you need to use the set method for each assignment:
generateComposePreviewRobolectricTests.enable.set(true)
generateComposePreviewRobolectricTests.packages.set(["com.example"])
If the generated tests are slow or the recorded images are large, renderScale is the knob for it.
A value below 1.0 renders every preview at a lower device density, so fewer pixels are rendered:
the tests spend less time rendering and the images take less space. What you pay for it is
fidelity, so it pays off on previews that stay readable at the smaller size.
What the scale does and does not change — density-qualified resources, raw-pixel drawing, the dpi
rounding, when it is applied — is documented on the renderScale property itself, which your IDE
shows as you type it.
renderScale is not the same as resizeScale:
| Property | When it applies | What it changes |
|---|---|---|
renderScale |
Before Compose renders | Device density. Logical dp dimensions are preserved, so a smaller surface is rendered. Density-qualified resources (drawable-hdpi and so on) may resolve differently. |
resizeScale (RoborazziOptions.RecordOptions, roborazzi.record.resizeScale) |
After the screenshot is captured | Downsamples the captured bitmap. Rendering cost is unchanged. |
Both change the recorded image dimensions at the same output paths, so existing golden images have to be recorded again after you set either of them.
In the Groovy DSL, write the value as a double literal: renderScale = 0.5d. A bare 0.5 is a BigDecimal and fails to convert.
To scale a single preview differently, annotate it with @RoboComposePreviewOptions(renderScale = ...). This is useful when only a few previews are large enough to be worth the loss of fidelity:
@RoboComposePreviewOptions(renderScale = 0.5)
@Preview(device = "spec:width=1280dp,height=800dp,dpi=240")
@Composable
fun TabletPreview() {
}
Previews without the annotation keep the scale configured in the Gradle extension.
annotationFilter controls which previews are captured (requires the roborazzi-annotations dependency).
By default it is AnnotationFilter.Filter.RoboPreviewExclude, so previews annotated with
@RoboPreviewExclude are skipped. Set it to RoboPreviewInclude to capture only previews
annotated with @RoboPreviewInclude:
roborazzi {
  @OptIn(ExperimentalRoborazziApi::class)
  generateComposePreviewRobolectricTests {
    enable = true
    packages = listOf("com.example")
    annotationFilter = AnnotationFilter.Filter.RoboPreviewInclude
  }
}
To filter by your own annotations, pass their fully qualified class names
(use the JVM binary name with $ for nested classes, e.g. com.example.Outer$Inner):
// Set either one, not both
annotationFilter = AnnotationFilter.Exclude("com.example.MyExcludeAnnotation")
annotationFilter = AnnotationFilter.Include("com.example.MyIncludeAnnotation")The Compose Preview support also works with Compose Multiplatform common previews (@Preview in commonMain). You can scan them with the CommonComposablePreviewScanner from the ComposablePreviewScanner common artifact in a custom tester; the generated tests run as Android unit tests with Robolectric. See the multiplatform sample project for a complete setup.
Roborazzi can also generate preview screenshot tests for the Compose Desktop (JVM)
target, without Robolectric. Previews are scanned with ComposablePreviewScanner's
android artifact, which is a pure-JVM jar: it finds the multiplatform
androidx.compose.ui.tooling.preview.Preview annotation on the classpath, so previews
declared in commonMain are captured too.
jvm()
target or a plain org.jetbrains.kotlin.jvm project. For an Android-only project
that means a KMP migration first — stick with the Robolectric preview tests there.
Desktop tests shine for already-multiplatform code and Desktop-only apps.Enable it in your build.gradle.kts:
roborazzi {
  @OptIn(ExperimentalRoborazziApi::class)
  generateComposePreviewDesktopTests {
    enable = true
    packages = listOf("com.example")
    // Required only when the project has multiple Kotlin JVM targets:
    // targetName = "desktop"
  }
}
Add the dependencies to the JVM target's test source set. If your previews use the
Roborazzi marker annotations (@RoboPreviewExclude, @RoboComposePreviewOptions, ...),
also add roborazzi-annotations to the source set that declares the previews
(usually commonMain — test dependencies do not flow into main source sets):
kotlin {
  sourceSets {
    val commonMain by getting {
      dependencies {
        // Only needed when previews use the Roborazzi marker annotations
        implementation("io.github.takahirom.roborazzi:roborazzi-annotations:[version]")
      }
    }
    val desktopTest by getting {
      dependencies {
        implementation("io.github.takahirom.roborazzi:roborazzi-compose-desktop-preview-scanner-support:[version]")
        implementation("io.github.sergio-sastre.ComposablePreviewScanner:android:[version]")
        implementation("junit:junit:4.13.2")
      }
    }
  }
}
Plain JVM projects (org.jetbrains.kotlin.jvm) are also supported: add the same
dependencies with testImplementation(...) and use the Jvm task names
(recordRoborazziJvm, compareRoborazziJvm, verifyRoborazziJvm).
Then run the desktop Roborazzi tasks:
./gradlew recordRoborazziDesktop
./gradlew compareRoborazziDesktop
./gradlew verifyRoborazziDesktop
Note: ComposablePreviewScanner is published with JVM 17 metadata, so the desktop
target needs to target JVM 17 (or relax the test classpath's TargetJvmVersion
attribute). See the desktop multiplatform sample
for a complete setup, including manual usage of the tester API without the generator.
Desktop preview screenshots use the same file names as the Robolectric preview tests
(fully qualified class name + method name + preview parameter suffix), so the same
preview produces the same file name on both platforms. If one module enables both
generateComposePreviewRobolectricTests and generateComposePreviewDesktopTests, the
two sets of screenshots would overwrite each other in the shared output directory, so
Roborazzi fails with a configuration error unless
separateOutputDirs
is enabled, which gives each task its own subdirectory.
DefaultDesktopComposePreviewTester accepts a Capturer whose receiver is the raw
ComposeUiTest scope, so anything possible inside runDesktopComposeUiTest — clock
control, interactions, wrapping the content in a theme — stays possible:
@OptIn(ExperimentalRoborazziApi::class, ExperimentalTestApi::class)
class MyDesktopPreviewTester : DesktopComposePreviewTester by DefaultDesktopComposePreviewTester(
  capturer = DefaultDesktopComposePreviewTester.Capturer { parameter ->
    setContent { MyTheme { parameter.preview() } }
    // Keep @RoboComposePreviewOptions manualClockOptions working: without this,
    // time-suffixed captures would all show the initial state.
    advanceMainClockFor(parameter)
    onRoot().captureRoboImage(parameter.filePath, parameter.roborazziOptions)
  }
)
Reference your tester in the Gradle configuration with
testerQualifiedClassName = "com.example.MyDesktopPreviewTester" (the class needs a
parameterless constructor). If you need to change scanning or file naming as well,
implement DesktopComposePreviewTester by delegating to the default tester and
override the corresponding method (testParameters() / test()).
To wrap each generated test in a JUnit TestRule (a TestWatcher, retry rule, etc.),
override options() and provide a testRuleFactory:
@OptIn(ExperimentalRoborazziApi::class, InternalRoborazziApi::class)
class MyDesktopPreviewTester : DesktopComposePreviewTester by DefaultDesktopComposePreviewTester() {
  override fun options(): DesktopComposePreviewTester.Options =
    DesktopComposePreviewTester.defaultOptionsFromPlugin.copy(
      testLifecycleOptions = DesktopComposePreviewTester.Options.JUnit4TestLifecycleOptions(
        testRuleFactory = { MyWatcherRule() }
      )
    )
}
Unlike the Robolectric tester there is no compose rule factory: Compose Desktop's test
harness is function-scoped (runDesktopComposeUiTest), not rule-based.
| Feature | Android (Robolectric) | Compose Desktop |
|---|---|---|
| Generated preview tests | ✅ | ✅ |
packages, includePrivatePreviews, testerQualifiedClassName, generatedTestClassCount
|
✅ | ✅ |
annotationFilter (@RoboPreviewInclude / @RoboPreviewExclude) |
✅ | ✅ |
@PreviewParameter (PreviewParameterProvider, one capture per value) |
✅ | ✅ |
@RoboComposePreviewOptions (manualClockOptions, one test per variation) |
✅ | ✅ |
Custom JUnit TestRule around generated tests (testRuleFactory) |
✅ | ✅ |
Compose rule factory (composeRuleFactory) |
✅ | Not applicable (function-scoped harness) |
@Preview annotation options (widthDp/heightDp, fontScale, showBackground/backgroundColor, locale, uiMode dark bit) |
✅ (see below) | ✅ |
@Preview(device = ...) |
✅ | Not applicable (no device configuration on desktop) |
robolectricConfig (device qualifiers, SDK) |
✅ | Not applicable |
On Compose Desktop the @Preview annotation options are applied as follows:
widthDp/heightDp: the preview is wrapped in a fixed-size box (density is 1, so 1dp equals 1px). When neither is specified the preview still renders wrap-content.fontScale: applied through LocalDensity (density stays 1), because DeviceConfigurationOverride.FontScale is unsupported on desktop.showBackground/backgroundColor: draws a background behind the preview, defaulting to white when showBackground = true but no color is given.locale: sets java.util.Locale.getDefault() for the capture and restores it afterwards. Accepts "ja", "ja-rJP", and "ja-JP" forms.uiMode: only the night bit is honored (dark mode via LocalSystemTheme); other configuration bits are ignored.device: not applicable, as desktop has no device configuration.To enable fine-grained control over screenshot timing in Compose Previews, add the annotations dependency:
testImplementation("io.github.takahirom.roborazzi:roborazzi-annotations:[version]")Use @RoboComposePreviewOptions to configure time-based captures:
@RoboComposePreviewOptions(
  manualClockOptions = [ManualClockOptions(advanceTimeMillis = 516L)]
)
@Preview
@Composable
fun DelayedPreview() {
  var visible by remember { mutableStateOf(false) }
  LaunchedEffect(Unit) {
    delay(500)
    visible = true
  }
  if (visible) {
    Text("Content appears after 500ms")
  }
}
This annotation enables capturing screenshots at specific time intervals, particularly useful for testing animated components or delayed state changes.
Previews annotated with @PreviewWrapper (Compose UI 1.11+) are automatically wrapped by ComposablePreviewScanner 0.9.0 or later, so the wrapper's content, such as a theme or background, appears in the screenshots without any extra setup:
class MyWrapperProvider : PreviewWrapperProvider {
  @Composable
  override fun Wrap(content: @Composable () -> Unit) {
    MyTheme { content() }
  }
}

@PreviewWrapper(MyWrapperProvider::class)
@Preview
@Composable
fun WrappedPreview() { ... }Roborazzi provides a helper function for ComposablePreviewScanner. You can add the following dependency to your project to use the helper function:
testImplementation("io.github.takahirom.roborazzi:roborazzi-compose-preview-scanner-support:[version]")
Then you can use the ComposablePreview<AndroidPreviewInfo>.captureRoboImage() function to capture the Composable Preview using the settings in Preview annotations.
To obtain the ComposablePreview object, please refer to ComposablePreviewScanner.
fun ComposablePreview<AndroidPreviewInfo>.captureRoboImage(
  filePath: String,
  roborazziOptions: RoborazziOptions
)Currently, we don't support all the annotation options provided by the Compose Preview. You can check the supported annotations in the source code. We are looking forward to your contributions to support more annotation options.
Roborazzi supports AI-powered image assertion. AI-powered image assertion is an experimental feature. Screenshot tests are a great way to verify your app's UI, but verifying the content of the images can be a tedious and time-consuming task. This manual effort reduces scalability. Roborazzi can help automate this process through AI-powered image assertion, making it more efficient and scalable.
There are two library modules: io.github.takahirom.roborazzi:roborazzi-ai-gemini and io.github.takahirom.roborazzi:roborazzi-ai-openai for AI-powered image assertion.
roborazzi-ai-gemini leverages Gemini and generative-ai-kmp, while roborazzi-ai-openai utilizes the OpenAI API through raw HTTP API calls implemented with Ktor and KotlinX Serialization
...
@get:Rule
val composeTestRule = createAndroidComposeRule<MainActivity>()

@get:Rule
val roborazziRule = RoborazziRule(
  options = RoborazziRule.Options(
    roborazziOptions = RoborazziOptions(
      compareOptions = RoborazziOptions.CompareOptions(
        aiAssertionOptions = AiAssertionOptions(
          aiAssertionModel = GeminiAiAssertionModel(
            // DO NOT HARDCODE your API key in your code.
            // This is an example passing API Key through unitTests.all{ environment(key, value) }
            apiKey = System.getenv("gemini_api_key") ?: ""
          ),
        )
      )
    )
  )
)

@Test
fun captureWithAi() {
  ROBORAZZI_DEBUG = true
  onView(ViewMatchers.isRoot())
    .captureRoboImage(
      roborazziOptions = provideRoborazziContext().options.addedAiAssertions(
        AiAssertionOptions.AiAssertion(
          assertionPrompt = "it should have PREVIOUS button",
          requiredFulfillmentPercent = 90,
        ),
        AiAssertionOptions.AiAssertion(
          assertionPrompt = "it should show First Fragment",
          requiredFulfillmentPercent = 90,
        )
      )
    )
}AI-Powered Image Assertion runs only when the images are different. If the images are the same, AI-Powered Image Assertion is skipped.
This is because AI-Powered Image Assertion can be slow and expensive.
You can use manual image assertion with Roborazzi. This allows you to utilize local LLMs or other LLMs. Manual Image Assertion doesn't require adding any dependencies other than Roborazzi itself.
You must provide the AiAssertionModel to RoborazziOptions to use manual image assertion.
interface AiAssertionModel {
  fun assert(
    referenceImageFilePath: String,
    comparisonImageFilePath: String,
    actualImageFilePath: String,
    aiAssertionOptions: AiAssertionOptions
  ): AiAssertionResults

  fun assert(
    targetImages: TargetImages,
    aiAssertionOptions: AiAssertionOptions
  ): AiAssertionResults
}
compareOptions = RoborazziOptions.CompareOptions(
aiAssertionOptions = AiAssertionOptions(
aiAssertionModel = object : AiAssertionOptions.AiAssertionModel {
override fun assert(
referenceImageFilePath: String,
comparisonImageFilePath: String,
actualImageFilePath: String,
aiAssertionOptions: AiAssertionOptions
): AiAssertionResults {
// You can use any LLMs here to create AiAssertionResults
return AiAssertionResults(
aiAssertionResults = aiAssertionOptions.aiAssertions.map { assertion ->
AiAssertionResult(
assertionPrompt = assertion.assertionPrompt,
fulfillmentPercent = 100,
requiredFulfillmentPercent = assertion.requiredFulfillmentPercent,
failIfNotFulfilled = assertion.failIfNotFulfilled,
explanation = "This is a manual test.",
)
}
)
}
override fun assert(
targetImages: TargetImages,
aiAssertionOptions: AiAssertionOptions
): AiAssertionResults {
// targetImages.images holds the images to assert (e.g. targetImages.images.first().filePath)
return AiAssertionResults(
aiAssertionResults = aiAssertionOptions.aiAssertions.map { assertion ->
AiAssertionResult(
assertionPrompt = assertion.assertionPrompt,
fulfillmentPercent = 100,
requiredFulfillmentPercent = assertion.requiredFulfillmentPercent,
failIfNotFulfilled = assertion.failIfNotFulfilled,
explanation = "This is a manual test.",
)
}
)
}
},
aiAssertions = listOf(
AiAssertionOptions.AiAssertion(
assertionPrompt = "it should have PREVIOUS button",
requiredFulfillmentPercent = 90,
),
),
)
)
...https://plugins.jetbrains.com/plugin/24561-roborazzi
Demo of Roborazzi IntelliJ IDEA and Android Studio Plugin.
https://github.com/takahirom/roborazzi/assets/1386930/bd3e8106-1971-4ec4-b764-3f1831999228
The Roborazzi plugin enhances your development workflow by automatically displaying screenshots related to Roborazzi's screenshot tests within IntelliJ IDEA. Easily view and verify visual outputs directly in your IDE, streamlining your testing and development process.
Roborazzi supports Compose Multiplatform iOS. You can use Roborazzi with Compose iOS as follows:
Gradle settings
plugins {
  kotlin("multiplatform")
  id("org.jetbrains.compose")
  id("io.github.takahirom.roborazzi")
}

kotlin {
  sourceSets {
    ...
    val appleTest by getting {
      dependencies {
        implementation("io.github.takahirom.roborazzi:roborazzi-compose-ios:[version]") // Use 1.13.0 or higher
        implementation(kotlin("test"))
      }
    }
  ...
Test with Roborazzi
class IosTest {
  @OptIn(ExperimentalTestApi::class)
  @Test
  fun test() {
    runComposeUiTest {
      setContent {
        MaterialTheme {
          Column {
            Button(onClick = { }) {
              Text("Hello World")
            }
            Box(
              modifier = Modifier
                .background(Color.Red.copy(alpha = 0.5f), MaterialTheme.shapes.small)
                .size(100.dp),
            )
          }
        }
      }
      // iOS uses the same RoborazziOptions as the other targets. For example,
      // allow up to 1% of pixels to differ before a comparison fails.
      val roborazziOptions = RoborazziOptions(
        compareOptions = RoborazziOptions.CompareOptions(changeThreshold = 0.01F),
      )
      // Unlike the JVM, iOS has no automatic file-name generation, so filePath
      // is required for every capture.
      onRoot().captureRoboImage(this, filePath = "ios.png", roborazziOptions = roborazziOptions)
      onNodeWithText("Hello World").captureRoboImage(
        this,
        filePath = "ios_button.png",
        roborazziOptions = roborazziOptions,
      )
    }
  }
}
Then, you can run the Gradle tasks for iOS Support, just like you do for Android Support.
./gradlew recordRoborazzi[SourceSet]
./gradlew recordRoborazziIosSimulatorArm64
./gradlew compareRoborazziIosSimulatorArm64
./gradlew verifyRoborazziIosSimulatorArm64
...
The currently implemented features for iOS support are as follows:
| Feature | status |
|---|---|
| Record | supported |
| Compare | supported |
| Verify | supported |
| Report | supported |
| Dropbox/Differ comparison | supported |
| threshold / resultValidator | supported |
| diffPercentage | supported |
| resizing image (resizeScale) | supported |
| context data | supported (user-supplied only; the automatically-added default context data such as the test class name is JVM-only) |
| custom reporter | supported |
| ComparisonStyle | supported (Simple and Grid; Grid falls back to Simple when the density is unavailable) |
| RoborazziRecordFilePathStrategy | 🆖 (filePath is required; a relative path always resolves against the output directory) |
| automatic file naming | 🆖 (filePath is required) |
| image format | PNG only (WebP encoding is not supported on iOS) |
| pixelBitConfig | 🆖 (Rgb565 falls back to Argb8888 with a warning; CoreGraphics has no 5-6-5 format) |
| dump | n/a (Robolectric-only concept) |
| applyDeviceCrop | n/a (Robolectric-only concept) |
UI tree dump JSON sidecar (uiTreeDumpOptions) |
supported (record writes MyTest.uitree.json next to the golden; compare/verify writes MyTest_actual.uitree.json in the compare output directory — the same _actual basename contract as the other platforms) |
UI tree annotated image (annotateImage) |
supported (drawn with UIKit/CoreGraphics; MyTest.annotated.png / MyTest_actual.annotated.png, matching the Android/Desktop look) |
Note on translucent pixels: the iOS canvas stores pixels premultiplied (a CoreGraphics constraint), so translucent colors lose precision proportional to
255 / alpha(opaque pixels are lossless). The loss is deterministic, so comparing identically-produced images is unaffected; only cross-source comparisons of low-alpha content may need a small threshold.
iOS runs on the same shared pipeline as the JVM and Compose Desktop targets
(RoborazziOptions → processOutputImageAndReport → RoboCanvas), so the image
comparator, threshold / resultValidator, resizeScale, context data, custom
reporters, and the reference | diff | new comparison output (including
ComparisonStyle.Grid) all behave the same way. A few platform-specific
features remain unsupported (see the table above); contributions are welcome.
Roborazzi supports Compose Desktop. You can use Roborazzi with Compose Desktop as follows:
Gradle settings
plugins {
  kotlin("multiplatform")
  id("org.jetbrains.compose")
  id("io.github.takahirom.roborazzi")
}

kotlin {
  // You can use your source set name
  jvm("desktop")
  sourceSets {
    ...
    val desktopTest by getting {
      dependencies {
        implementation("io.github.takahirom.roborazzi:roborazzi-compose-desktop:[version]") // Use 1.6.0-alpha-2 or higher
        implementation(kotlin("test"))
      }
    }
    ...
Test target Composable function
@Composable
fun App() {
  var text by remember { mutableStateOf("Hello, World!") }

  MaterialTheme {
    Button(
      modifier = Modifier.testTag("button"),
      onClick = {
        text = "Hello, Desktop!"
      }) {
      Text(
        style = MaterialTheme.typography.h2,
        text = text
      )
    }
  }
}
Test with Roborazzi
class MainKmpTest {
  @OptIn(ExperimentalTestApi::class)
  @Test
  fun test() = runDesktopComposeUiTest {
    setContent {
      App()
    }
    val roborazziOptions = RoborazziOptions(
      recordOptions = RoborazziOptions.RecordOptions(
        resizeScale = 0.5
      ),
      compareOptions = RoborazziOptions.CompareOptions(
        changeThreshold = 0F
      )
    )
    onRoot().captureRoboImage(roborazziOptions = roborazziOptions)

    onNodeWithTag("button").performClick()

    onRoot().captureRoboImage(roborazziOptions = roborazziOptions)
  }
}
Then, you can run the Gradle tasks for Desktop Support, just like you do for Android Support.
./gradlew recordRoborazzi[SourceSet]
./gradlew recordRoborazziDesktop
./gradlew compareRoborazziDesktop
./gradlew verifyRoborazziDesktop
...
If you use the Kotlin JVM plugin, the task will be recordRoborazzi**Jvm**.
Compose Desktop has full UI tree dump
support: enabling uiTreeDumpOptions (or -Proborazzi.dumpUiTree=true) on a
SemanticsNodeInteraction.captureRoboImage writes both the MyTest.uitree.json
sidecar and (by default) the annotated MyTest.annotated.png, with the same
naming and _actual basename semantics as Android.
The sample image
You can configure the following options in your gradle.properties file.
You can also use -P to set the options in the command line. For example, ./gradlew test -Proborazzi.test.record=true.
This option enables you to configure the behavior of Roborazzi. By default, all settings are set to false. For the tasks these properties correspond to, see Build setup.
roborazzi.test.record=true
# roborazzi.test.compare=true
# roborazzi.test.verify=trueThis option lets you set the resize scale for the image being recorded. The default value is 1.0.
roborazzi.record.resizeScale=0.5This setting allows you to specify the file path strategy for the recorded image. The default strategy is relativePathFromCurrentDirectory. If you choose relativePathFromRoborazziContextOutputDirectory, the file will be saved in the output directory specified by roborazzi.outputDir.
roborazzi.record.filePathStrategy=relativePathFromRoborazziContextOutputDirectoryThis option enables you to define the naming strategy for the recorded image. The default strategy is testPackageAndClassAndMethod.
testPackageAndClassAndMethod, the file name will be com.example.MyTest.testMethod.png.escapedTestPackageAndClassAndMethod, the file name will be com_example_MyTest.testMethod.png.testClassAndMethod, the file name will be MyTest.testMethod.png.testPackageDirAndClassAndMethod, the file will be saved as com.example/MyTest.testMethod.png (the package becomes a single directory level).testNestedPackageDirAndClassAndMethod, the file will be saved as com/example/MyTest.testMethod.png (the package becomes nested directories).roborazzi.record.namingStrategy=testClassAndMethodThis option allows you to clean up old screenshots. By default, this option is set to false. The reason why Roborazzi does not delete old screenshots by default is that Roborazzi doesn't know if you are running filtered tests or not. If you are running filtered tests, Roborazzi will delete the screenshots that are not related to the current test run.
roborazzi.cleanupOldScreenshots=trueThis option enables the UI tree dump (JSON).
When set to true, each captured screenshot gets a machine-readable
.uitree.json sidecar written next to the image it describes
(MyTest.uitree.json on record, MyTest_actual.uitree.json on compare/verify).
By default this option is set to false. The sidecar is informational only: it
never participates in image diffing and never fails verification.
roborazzi.dumpUiTree=trueI recommend setting it.systemProperties["robolectric.pixelCopyRenderMode"] = "hardware" in your build.gradle file to enhance the accuracy of your screenshots. For more details, please refer to the issue.
android {
    testOptions {
    ...
        unitTests {
            isIncludeAndroidResources = true
            isReturnDefaultValues = true
            all {
                it.systemProperties["robolectric.pixelCopyRenderMode"] = "hardware"
            }
        }
    }
}A: To run only screenshot tests, you can configure your project with the following:
android {
    testOptions {
        unitTests {
            all {
                // -Pscreenshot to filter screenshot tests
                it.useJUnit {
                    if (project.hasProperty("screenshot")) {
                        includeCategories("io.github.takahirom.roborazzi.testing.category.ScreenshotTests")
                    }
                }
            }
        }
    }
}
Include the -Pscreenshot property, and only the screenshot tests will be run.
Note: This feature is not provided in the Roborazzi library itself, to keep it simple and utilize JUnit's built-in features for test filtering.
You can also annotate your tests like this:
/**
 * You can filter ScreenshotTests using -Pscreenshot parameter
 */
interface ScreenshotTests

@Test
@Category(ScreenshotTests::class)
fun checkLaunchShot() {
  onRoot().captureRoboImage(roborazziOptions = roborazziOptions)
}
This allows you to create a category of screenshot tests and filter them using the -Pscreenshot property, thus making it easier to run only those specific tests.
A: To execute screenshot tests using Android Studio's Run button, configure your project as follows:
gradle.properties
roborazzi.test.record=trueAfter that, you can execute screenshot tests using either Android Studio's Run or Debug button as you normally would.
A: If your screenshot tests are not capturing images, there may be several patterns that are causing this issue. Please follow these troubleshooting steps:
ROBORAZZI_DEBUG = true to see logs.recordRoborazziDebug task is running.captureRoboImage() is being called.A: As of now, there is no direct support for running Roborazzi with Bazel. However, it is possible to do so. Please refer to the following comment for more details: Roborazzi Bazel Support Comment
A: The behavior you are experiencing may be related to caching issues. Although it's
experimental, you can set the outputDir parameter in your build.gradle file to handle caching
and improve the stability of your tests. This parameter allows you to specify the output directory
for your screenshots, which can help in managing the cache. Here is how you can set it up:
If you use the default output directory(module/build/outputs/roborazzi), specifying the outputDir
parameter is not necessary. For more reference, you can check
out the issue.
roborazzi {
    outputDir = "src/your/screenshot/folder"
}
If the caching problems appear when several Roborazzi test tasks run in a single
Gradle invocation (for example check or Kotlin Multiplatform's allTests), the tasks
may be racing over the shared output directory. In that case you can enable the
experimental separateOutputDirs option so each variant/target gets its own directory.
See Separate output directories per variant/target.
A: This is a known issue caused by variations in how graphics libraries render components on different platforms. As we've seen with Now in Android, there are no guarantees for identical rendering across all environments. To ensure more consistent results, consider configuring your continuous integration (CI) environment to both record and test screenshots. This setup minimizes discrepancies by using the same settings and resources for all tests.
A: First, please check if you are using the correct version of the Android SDK. Consider using API level 28 or higher because it seems that Robolectric Native Graphics doesn't work properly on older SDK versions.
You can specify the SDK version like @Config(sdk = [33]) or by using robolectric.properties with sdk=33.
https://robolectric.org/configuring/
If your images are mostly fine but there are some drawing issues like shadows or shape graphics, you can try using Robolectric's Hardware Rendering mode. Please refer to this issue.
A: You may solve this by using unitTests.maxHeapSize to adjust the unit test heap size as follows:
android {
  ...
  testOptions {
    unitTests.all {
      maxHeapSize = "4096m"
    }
  }
}
It is discussed in this issue. Additionally, it might be worth trying to run your tests with VisualVM to monitor memory usage and identify potential leaks.
A: It is discussed in this issue.
To enable the display of Roborazzi tasks, please enable Configure all Gradle tasks during Gradle Sync (this can make Gradle Sync slower) in the Settings | Experimental | Gradle.
Copyright 2023 takahirom
Copyright 2019 Square, Inc.
Copyright The Android Open Source Project

Licensed under the Apache License, Version 2.0 (the "License");
you may not use this file except in compliance with the License.
You may obtain a copy of the License at

   http://www.apache.org/licenses/LICENSE-2.0

Unless required by applicable law or agreed to in writing, software
distributed under the License is distributed on an "AS IS" BASIS,
WITHOUT WARRANTIES OR CONDITIONS OF ANY KIND, either express or implied.
See the License for the specific language governing permissions and
limitations under the License.
Make JVM Android Integration Test Visible
Screenshot testing is key to validate your app's appearance and functionality. It efficiently detects visual issues and tests the app as users would use it, making it easier to spot problems. It's quicker than writing many assert statements, ensuring your app looks right and behaves correctly.
JVM tests, also known as local tests, are placed in the test/ directory and are run on a developer's PC or CI environment. On the other hand, device tests, also known as Instrumentation tests, are written in the androidTest/ directory and are run on real devices or emulators. Device testing can result in frequent failures due to the device environment, leading to false negatives. These failures are often hard to reproduce, making them tough to resolve.
Paparazzi is a great tool for visualizing displays within the JVM. However, it's incompatible with Robolectric, which also mocks the Android framework.
Roborazzi fills this gap. It integrates with Robolectric, allowing tests to run with Hilt and interact with components. Essentially, Roborazzi enhances Paparazzi's capabilities, providing a more efficient and reliable testing process by capturing screenshots with Robolectric.
Leveraging Roborazzi in Test Architecture: An Example
Integrating Roborazzi into the Architecture: An Example from DroidKaigi 2023 App
In the DroidKaigi 2023 app, Roborazzi was introduced from the early stages of development as part of the architectural design. This integration allowed the team to verify changes throughout the development process. The specific architectural decisions and how they were implemented can be found README.
Roborazzi ships its documentation as an installable agent skill. Running the following command installs the docs into your AI coding agent (Claude Code, Cursor, Codex, Android Studio Agent Mode, Antigravity, Gemini CLI, etc.), so the agent can look up Roborazzi setup and usage while working on your project:
npx skills add takahirom/roborazziAvailable on Maven Central.
This is an example of adding Robolectric to your project: https://github.com/takahirom/roborazzi-usage-examples/compare/b697...5c12
This library is dependent on Robolectric. Please see below to add Robolectric.
https://robolectric.org/getting-started/
This is an example of adding Roborazzi to your project: https://github.com/takahirom/roborazzi-usage-examples/commit/3a02
To take screenshots, please use Robolectric 4.10 alpha 1 or later and please
add @GraphicsMode(GraphicsMode.Mode.NATIVE) to your test class.
@GraphicsMode(GraphicsMode.Mode.NATIVE)Roborazzi is available on maven central.
This plugin simply creates Gradle tasks record, verify, compare and passes the configuration to the test.
build.gradle.kts
| plugins | buildscript |
|
Define plugin in root build.gradle.kts plugins {
...
id("io.github.takahirom.roborazzi") version "[version]" apply false
}Apply plugin in module build.gradle.kts plugins {
...
id("io.github.takahirom.roborazzi")
} |
root build.gradle.kts buildscript {
dependencies {
...
classpath("io.github.takahirom.roborazzi:roborazzi-gradle-plugin:[version]")
}
}module build.gradle.kts plugins {
...
id("io.github.takahirom.roborazzi")
} |
| plugins | buildscript |
|
Define plugin in root build.gradle plugins {
...
id "io.github.takahirom.roborazzi" version "[version]" apply false
}Apply plugin in module build.gradle plugins {
...
id 'io.github.takahirom.roborazzi'
} |
root build.gradle buildscript {
dependencies {
...
classpath "io.github.takahirom.roborazzi:roborazzi-gradle-plugin:[version]"
}
}module build.gradle apply plugin: "io.github.takahirom.roborazzi" |
| Description | Dependencies |
|---|---|
| Core functions | testImplementation("io.github.takahirom.roborazzi:roborazzi:[version]") |
| Jetpack Compose | testImplementation("io.github.takahirom.roborazzi:roborazzi-compose:[version]") |
| JUnit rules | testImplementation("io.github.takahirom.roborazzi:roborazzi-junit-rule:[version]") |
| Use Roborazzi task | Use default unit test task | Description |
|
|
or
|
Record a screenshot |
|
|
or
|
Review changes made to an image. This action will
compare the current image with the saved one, generating a comparison image labeled
as |
|
|
or
|
Validate changes made to an image. If there is any difference between the current image and the saved one, the test will fail. |
|
|
or
|
This task will first verify the images and, if differences are detected, it will record a new baseline. |
|
|
This is not a test task. |
Note: This is an experimental task. This task will clear the saved images. This task also deletes the cached images. Please be careful when using this task. |
The comparison image, saved as [original]_compare.png, is shown below:
You can check the test report in build/reports/roborazzi/index.html
This uses JetNew from Compose Samples. You can check the pull request introducing Roborazzi to the compose-samples here.
Roborazzi uses module/build/outputs/roborazzi as the default directory for reference images and comparison images. You can customize these paths in your build.gradle file:
roborazzi {
  // Directory for reference images
  outputDir.set(file("src/screenshots"))
  // Directory for comparison images (Experimental option)
  compare {
    outputDir.set(file("build/outputs/screenshots_comparison"))
  }
}
[!NOTE] By default, when you use
captureRoboImage("image.png"), the image will be saved asmodule/image.png.
You can customize the file path strategy for the recorded image. The default strategy isrelativePathFromCurrentDirectory. If you selectrelativePathFromRoborazziContextOutputDirectory, the file will be saved in the output directory specified byroborazzi.outputDir.
This can be configured in yourgradle.propertiesfile:roborazzi.record.filePathStrategy=relativePathFromRoborazziContextOutputDirectory
By default, every Roborazzi task shares a single output directory (build/outputs/roborazzi) and a single intermediate directory (build/intermediates/roborazzi). When multiple Roborazzi test tasks run in a single Gradle invocation (for example check, or Kotlin Multiplatform's allTests), their directory reads and writes can race with each other. On Gradle 9 this can hard-fail with Cannot access input property 'roborazziImageInput' (see #830).
Enabling separateOutputDirs gives each task slug its own subdirectory, so the tasks never share a directory:
roborazzi {
  // Experimental
  separateOutputDirs.set(true)
}
The unit of separation is the recordRoborazzi<Slug> slug:
build/outputs/roborazzi/debug/, build/outputs/roborazzi/release/.build/outputs/roborazzi/desktop/.The intermediate directory is separated the same way (e.g. build/intermediates/roborazzi/debug/). If you set a custom outputDir, the per-slug subdirectory is created under it.
[!IMPORTANT] Enabling this option changes where golden images are stored. Existing users must re-record (or manually move) their goldens into the new per-slug subdirectory, otherwise verification will not find them. This is opt-in and defaults to
false, so existing behavior is unchanged unless you enable it.This also partially addresses requests for per-flavor/variant subdirectories (#804, #731).
You can take a screenshot by calling captureRoboImage().
app/src/test/java/../ManualTest.kt
import androidx.compose.ui.test.junit4.createAndroidComposeRule
import androidx.test.core.app.ActivityScenario
import androidx.test.espresso.Espresso.onView
import androidx.test.ext.junit.runners.AndroidJUnit4
import org.junit.Test
import org.junit.runner.RunWith
import org.robolectric.annotation.GraphicsMode

// All you need to do is use the captureRoboImage function in the test!
import com.github.takahirom.roborazzi.captureRoboImage


// Tips: You can use Robolectric while using AndroidJUnit4
@RunWith(AndroidJUnit4::class)
// Enable Robolectric Native Graphics (RNG)
@GraphicsMode(GraphicsMode.Mode.NATIVE)
class ManualTest {
  @get:Rule
  val composeTestRule = createAndroidComposeRule<MainActivity>()

  @Test
  fun captureRoboImageSample() {
    // Tips: You can use Robolectric with Espresso API
    // launch
    ActivityScenario.launch(MainActivity::class.java)

    // Capture screen
    onView(ViewMatchers.isRoot())
      // If you don't specify a screenshot file name, Roborazzi will automatically use the method name as the file name for you.
      // The format of the file name will be as follows:
      // build/outputs/roborazzi/com_..._ManualTest_captureRoboImageSample.png
      .captureRoboImage()

    // Capture Jetpack Compose Node
    composeTestRule.onNodeWithTag("AddBoxButton")
      .onParent()
      .captureRoboImage("build/compose.png")
  }
}
Roborazzi supports the following APIs.
| Capture | Code |
| ✅ Jetpack Compose's onNode() |
composeTestRule.onNodeWithTag("AddBoxButton")
.captureRoboImage() |
| ✅ Espresso's onView() |
onView(ViewMatchers.isRoot())
.captureRoboImage()onView(withId(R.id.button_first))
.captureRoboImage() |
| ✅ View |
val view: View = composeTestRule.activity.findViewById<View>(R.id.button_second)
view.captureRoboImage() |
| ✅ Jetpack Compose lambda |
captureRoboImage() {
  Text("Hello Compose!")
} |
|
Experimental🧪 ✅ Captures the entire screen, including dialogs |
captureScreenRoboImage() |
| ✅ Bitmap |
val bitmap: Bitmap = createBitmap(100, 100, Bitmap.Config.ARGB_8888)
  .apply {
    applyCanvas {
      drawColor(android.graphics.Color.YELLOW)
    }
  }
bitmap.captureRoboImage() |
You can configure the device by using the @Config annotation and RobolectricDeviceQualifiers.
| Configuration | Code |
| ✅ Predefined device configuration |
You can change the device configuration by adding @RunWith(AndroidJUnit4::class)
@GraphicsMode(GraphicsMode.Mode.NATIVE)
@Config(qualifiers = RobolectricDeviceQualifiers.Pixel5)
class RoborazziTest {@Test
@Config(qualifiers = RobolectricDeviceQualifiers.Pixel5)
fun test() { |
| ✅ Night mode |
@Config(qualifiers = "+night") |
| ✅ Locale |
@Config(qualifiers = "+ja") |
| ✅ Screen size |
@Config(qualifiers = RobolectricDeviceQualifiers.MediumTablet) |
See Integrate to your GitHub Actions for CI workflows that store, verify, and compare screenshots.
RoborazziRule is a JUnit rule for Roborazzi.
RoborazziRule is optional. You can use captureRoboImage() without this rule.
RoborazziRule has two features.
RoborazziOptions and outputDirectoryPath etc for captureRoboImage().For example, The following code generates an output file
named **custom_outputDirectoryPath**/**custom_outputFileProvider**-com.github.takahirom.roborazzi.sample.RuleTestWithPath.captureRoboImage.png :
@RunWith(AndroidJUnit4::class)
@GraphicsMode(GraphicsMode.Mode.NATIVE)
class RuleTestWithPath {
  @get:Rule
  val roborazziRule = RoborazziRule(
    options = Options(
      outputDirectoryPath = "$DEFAULT_ROBORAZZI_OUTPUT_DIR_PATH/custom_outputDirectoryPath",
      outputFileProvider = { description, outputDirectory, fileExtension ->
        File(
          outputDirectory,
          "custom_outputFileProvider-${description.testClass.name}.${description.methodName}.$fileExtension"
        )
      }
    ),
  )

  @Test
  fun captureRoboImage() {
    launch(MainActivity::class.java)
    // The file will be saved using the rule's outputDirectoryPath and outputFileProvider
    onView(isRoot()).captureRoboImage()
  }
}
To record test interactions as animated images (captureRoboGif(), recordRoboVideo()),
see Capture GIFs and videos.
RoborazziRule.Options has:
captureType — what the rule captures per test: None (default; the rule only provides
context), LastImage, AllImage (an image per layout change, like TestClass_method_0.png),
or Gif. The image-generating types take onlyFail = true to capture only when the test
fails. Annotate a test with @RoborazziRule.Ignore to exclude it from these capture types.outputDirectoryPath / outputFileProvider — where output files go and how they are named.roborazziOptions — the RoborazziOptions provided to captureRoboImage() in the test.See RoborazziRule for the full definition.
When comparing images, you may encounter differences due to minor changes related to antialiasing. You can use the options below to avoid this.
@get:Rule
val roborazziRule = RoborazziRule(
    options = RoborazziRule.Options(
        roborazziOptions = RoborazziOptions(
            compareOptions = RoborazziOptions.CompareOptions(
                changeThreshold = 0.01, // For 1% accepted difference
                imageComparator = SimpleImageComparator(
                    maxDistance = 0.007F, // 0.001F is default value from Differ
                    vShift = 2, // Increasing the shift can help resolve antialiasing issues
                    hShift = 2 // Increasing the shift can help resolve antialiasing issues
                )
            )
        )
    )
)You can set roborazzi.record.image.extension to webp in your gradle.properties file to generate WebP images.
roborazzi.record.image.extension=webpWebP is a lossy image format by default, which can make managing image differences challenging. To address this, we provide a lossless WebP image comparison feature.
To enable WebP support, add testImplementation("io.github.darkxanter:webp-imageio:0.3.3") to your build.gradle.kts file.
onView(ViewMatchers.withId(R.id.textview_first))
  .captureRoboImage(
    roborazziOptions = RoborazziOptions(
      recordOptions = RoborazziOptions.RecordOptions(
        imageIoFormat = LosslessWebPImageIoFormat(),
      ),
    )
  )
You can also use other image formats by implementing your own AwtImageWriter and AwtImageLoader.
data class JvmImageIoFormat(
  val awtImageWriter: AwtImageWriter,
  val awtImageLoader: AwtImageLoader
) : ImageIoFormatIf you are having trouble debugging your test, try Dump mode as follows.
For a machine-readable version of the UI tree for tools and AI agents, see UI tree dump (JSON).
Roborazzi Accessibility Checks is a library that integrates accessibility checks into Roborazzi. Please refer to Accessibility Check
Please check out RoborazziOptions for available Roborazzi options.
While Dump mode
renders the UI tree into an image for humans, UI tree dump writes a
machine-readable JSON sidecar next to the screenshot it describes, for tools
and AI agents to read. When enabled, capturing MyTest.png also writes
MyTest.uitree.json (the Compose semantics + View hierarchy of the current run)
and, by default, an annotated MyTest.annotated.png (see
Annotated image below).
The sidecar is written on record and compare/verify, next to the image the task
writes: MyTest.uitree.json on record, and MyTest_actual.uitree.json in the
compare output directory on compare/verify (an unchanged verify still writes it).
The sidecar is informational only: it never participates in image diffing and
never fails verification. Bitmap-based captureRoboImage(Bitmap...) captures
(which have no component tree) do not produce one.
Supported on Android/Robolectric, Compose Desktop, and Compose iOS, with identical output.
Via the Gradle property (no code change):
./gradlew recordRoborazziDebug -Proborazzi.dumpUiTree=trueOr per capture via RoborazziOptions:
onView(ViewMatchers.isRoot())
  .captureRoboImage(
    roborazziOptions = RoborazziOptions(
      uiTreeDumpOptions = UiTreeDumpOptions()
    )
){ "schemaVersion": 1, "capture": { "imageWidth": 220, "imageHeight": 100, "scale": 1.0 }, "root":
{ "type": "view", "className": "androidx.compose.ui.platform.ComposeView", "bounds": [0, 0, 220, 100], "children": [
{ "n": 1, "type": "compose", "testTag": "login_button", "bounds": [16, 24, 204, 72], "properties": { "Role": "Button", "Text": "Login" }, "actions": ["OnClick"], "flags": ["MergeDescendants"] },
{ "n": 2, "type": "compose", "bounds": [16, 80, 204, 96], "properties": { "Text": "Forgot password?" } } ] }
}The format is deliberately grep-first: one node per line with all of its scalar
attributes, so a single grep finds a node and its coordinates.
bounds is [left, top, right, bottom] in RAW (unscaled) window pixel
coordinates; the root capture object carries the output imageWidth/
imageHeight and scale. Map to image pixels with
image = (raw − root.bounds origin) × capture.scale — the root origin is
0, 0 for full-screen captures.visibility when the
node is visible).n is a sequential (1-based, pre-order) number on annotatable nodes only —
visible nodes with a test tag, a Text/ContentDescription, or an action; a
numbered MergeDescendants node's descendants are skipped."Set-of-Mark" refers to a prompting technique for vision-language models: overlaying numbered marks on image regions lets a model refer to a region unambiguously by its number (Yang et al., 2023).
Written by default next to the screenshot — a copy of the output with every
numbered node drawn as a labelled box — under the same naming as the sidecar:
MyTest.annotated.png on record, MyTest_actual.annotated.png on compare/verify
(an unchanged verify annotates the identical golden).
Each box's number is the same n as in the JSON, so an agent can point at
"element #3" and look up "n": 3 for its exact bounds, properties, and actions.
The annotated image is a display artifact of the current run only — never
compared, never failing a capture, never treated as a golden. Opt out with
UiTreeDumpOptions(annotateImage = false).
AI agents are bad at judging small layout changes from screenshots — ask one to "add margin above the button" and it will often claim "fixed" when nothing moved. The deterministic UI tree gives it exact coordinates to check instead, so the agent can read the button's bounds before and after and prove the change actually landed.
Record and read the node line:
./gradlew recordRoborazziDebug -Proborazzi.dumpUiTree=true
grep login_button build/outputs/roborazzi/MyTest.uitree.json
#  { "n": 1, "testTag": "login_button", "bounds": [16, 24, 204, 72], ... }
bounds is [left, top, right, bottom], so the top edge is at 24.
Make the change, keeping that before value in context.
Re-record (it overwrites the sidecar in place) and grep the same line:
# { "n": 1, "testTag": "login_button", "bounds": [16, 32, 204, 80], ... }
Top moved 24 → 32 — the button provably sits 8px lower. (To prove a gap,
also compare the sibling above: its bottom vs this top.) Because the output
is deterministic, any change in the numbers is a real layout change, not noise.
It is easy to integrate Roborazzi to your GitHub Actions.
name: store screenshots

on:
  push

env:
  GRADLE_OPTS: "-Dorg.gradle.jvmargs=-Xmx6g -Dorg.gradle.daemon=false -Dkotlin.incremental=false"

jobs:
  test:
    runs-on: macos-latest

    steps:
      - uses: actions/checkout@v4
      - uses: actions/setup-java@v4
        with:
          distribution: 'zulu'
          java-version: 19

      - name: Setup Gradle
        uses: gradle/actions/setup-gradle@v4

      - name: test
        run: |
          # Create screenshots
          ./gradlew app:recordRoborazziDebug --stacktrace

      # Upload screenshots to GitHub Actions Artifacts
      - uses: actions/upload-artifact@v4
        with:
          name: screenshots
          path: app/build/outputs/roborazzi
retention-days: 30name: verify test
on:
push
env:
GRADLE_OPTS: "-Dorg.gradle.jvmargs=-Xmx6g -Dorg.gradle.daemon=false -Dkotlin.incremental=false"
jobs:
test:
runs-on: macos-latest
steps:
- uses: actions/checkout@v4
- uses: actions/setup-java@v4
with:
distribution: 'zulu'
java-version: 19
- name: Setup Gradle
uses: gradle/actions/setup-gradle@v4
# Download screenshots from main branch
- uses: dawidd6/action-download-artifact@v6
with:
name: screenshots
path: app/build/outputs/roborazzi
workflow: test.yaml
branch: main
- name: verify test
id: verify-test
run: |
# If there is a difference between the screenshots, the test will fail.
./gradlew app:verifyRoborazziDebug --stacktrace
- uses: actions/upload-artifact@v4
if: ${{ always() }}
with:
name: screenshot-diff
path: app/build/outputs/roborazzi
retention-days: 30
- uses: actions/upload-artifact@v4
if: ${{ always() }}
with:
name: screenshot-diff-reports
path: app/build/reports
retention-days: 30
- uses: actions/upload-artifact@v4
if: ${{ always() }}
with:
name: screenshot-diff-test-results
path: app/build/test-results
retention-days: 30
For those who are looking for a more advanced example, we have prepared a sample repository that demonstrates how to use Roborazzi to compare snapshot results on GitHub pull requests. This sample showcases the integration of Roborazzi with GitHub Actions workflows, making it easy to visualize and review the differences between snapshots directly in the pull request comments.
Check out the roborazzi-compare-on-github-comment-sample repository to see this powerful feature in action and learn how to implement it in your own projects.
Example of the comment
Roborazzi can record test interactions as animated images: captureRoboGif()
captures visually distinct states as a GIF, and recordRoboVideo() records
animations frame by frame over virtual time.
@Test
fun captureRoboGifSample() {
  onView(ViewMatchers.isRoot())
    .captureRoboGif("build/test.gif") {
      // launch
      ActivityScenario.launch(MainActivity::class.java)
      // move to next page
      onView(withId(R.id.button_first))
        .perform(click())
      // back
      pressBack()
      // move to next page
      onView(withId(R.id.button_first))
        .perform(click())
    }
}
Note
You don't need to use RoborazziRule if you're using captureRoboGif().
With the JUnit test rule, you do not need to name the gif image, and if you prefer, you can output the gif image only if the test fails.
This test will output this file.
build/outputs/roborazzi/com.github.takahirom.roborazzi.sample.RuleTestWithOnlyFail_captureRoboGifSampleFail.gif
@RunWith(AndroidJUnit4::class)
@GraphicsMode(GraphicsMode.Mode.NATIVE)
class RuleTestWithOnlyFail {
  @get:Rule
  val roborazziRule = RoborazziRule(
    captureRoot = onView(isRoot()),
    options = Options(
      captureType = RoborazziRule.CaptureType.Gif(
        onlyFail = true
      ),
    )
  )

  @Test
  fun captureRoboGifSampleFail() {
    // launch
    ActivityScenario.launch(MainActivity::class.java)
    // move to next page
    onView(withId(R.id.button_first))
      .perform(click())
    // should fail because the button does not exist
    // Due to failure, the gif image will be saved in the outputs folder.
    onView(withId(R.id.button_first))
      .perform(click())
  }
}Test target
@Composable
fun SampleComposableFunction() {
  var count by remember { mutableStateOf(0) }
  Column(
    Modifier
      .size(300.dp)
  ) {
    Box(
      Modifier
        .testTag("AddBoxButton")
        .size(50.dp)
        .clickable {
          count++
        }
    )
    (0..count).forEach {
      Box(
        Modifier
          .size(30.dp)
      )
    }
  }
}
Test (Just add RoborazziRule)
@RunWith(AndroidJUnit4::class)
@GraphicsMode(GraphicsMode.Mode.NATIVE)
class ComposeTest {
  @get:Rule
  val composeTestRule = createAndroidComposeRule<ComponentActivity>()

  @get:Rule
  val roborazziRule = RoborazziRule(
    composeRule = composeTestRule,
    captureRoot = composeTestRule.onRoot(),
    options = RoborazziRule.Options(
      RoborazziRule.CaptureType.Gif()
    )
  )

  @Test
  fun composable() {
    composeTestRule.setContent {
      SampleComposableFunction()
    }
    (0 until 3).forEach { _ ->
      composeTestRule
        .onNodeWithTag("AddBoxButton")
        .performClick()
    }
  }
}
recordRoboVideo() records how the UI evolves over virtual time -- animations, transitions,
gestures and any other time-driven change -- as an animated image that plays back in real time.
Unlike captureRoboGif(), which only records visually distinct states with a fixed 1-second
delay, it pauses the Compose main clock and drives it frame by frame, so intermediate animation
frames are captured with faithful timing. Interactions in the block run with the clock paused;
call delay() in the scope to advance virtual time while frames are recorded. After the block
returns, recording continues until the UI settles, so a block that only performs a click still
records the whole animation the click starts.
@OptIn(ExperimentalRoborazziApi::class)
@Test
fun recordVideo() {
  composeTestRule.setContent {
    AnimatedBoxContent()
  }
  composeTestRule.onNodeWithTag("root")
    .recordRoboVideo(
      composeRule = composeTestRule,
      filePath = "build/outputs/roborazzi/video.gif",
      videoOptions = RoboVideoOptions(fps = 10),
    ) {
      composeTestRule.onNodeWithTag("toggle").performClick()
      delay(300)
      composeTestRule.onNodeWithTag("toggle").performClick()
      delay(300)
    }
}RoboVideoOptions: fps (default 10), settleTimeoutMillis (additional virtual time to
keep recording while the UI is still changing after the block ends; default 3000), and
backgroundColor (ARGB fill for the fixed recording viewport when frames have different
sizes; default white)..gif produces a GIF (256 colors; the
default), .png a lossless, full-color APNG (Animated PNG) -- prefer .png when color
fidelity matters. Only these animated-image formats are supported for now; the "video" name
was chosen deliberately so real video formats (e.g. mp4) can be added later without renaming
the API.fps whose frame step
(1000 / fps) is a multiple of 10ms (e.g. 10, 20, 25, 50) for exact GIF timing. APNG encodes
the step exactly.@ExperimentalRoborazziApi) and currently only supports recording:
when the Roborazzi task runs in compare/verify mode it is a complete no-op -- the block is not
executed and no image is recorded or verified.recordScreenRoboVideo() records all window roots instead of a single node, mirroring how
captureScreenRoboImage() relates to captureRoboImage(). Prefer it when you want a stable,
device-sized viewport for every frame, or to capture window overlays such as dialogs added
mid-recording or touch/tap indicators, which live on separate window roots and are invisible to a
node-scoped recording. Usage is the same, just without node scoping:
recordScreenRoboVideo(
  composeRule = composeTestRule,
  filePath = "build/outputs/roborazzi/video_screen.gif",
  videoOptions = RoboVideoOptions(fps = 10),
) {
  composeTestRule.onNodeWithTag("toggle").performClick()
  delay(300)
}
Because the recorder idles the Robolectric main Looper in lockstep with the Compose main clock,
suspend-based gesture drivers make progress while frames are recorded. For example, you can drive
a swipe with saket/touch-robot from a LaunchedEffect,
use recordScreenRoboVideo() so the touch indicator overlay is captured, and just pump virtual
time in the block:
composeTestRule.setContent {
  // A composable whose LaunchedEffect drives a touch-robot swipe on the root.
  DraggableBoxContent()
}
recordScreenRoboVideo(
  composeRule = composeTestRule,
  filePath = "build/outputs/roborazzi/swipe.gif",
) {
  // Pump virtual time so the LaunchedEffect gesture progresses while frames are captured.
  delay(1000)
}Roborazzi provides support for generating screenshot tests and easy setup for Jetpack Compose Preview. This support uses ComposablePreviewScanner to scan the Composable Previews in your project.
You first need to add the Roborazzi plugin to your project. Please refer to the setup guide for more information.
Then you can enable the Compose Preview screenshot test generation feature by adding the following configuration to your build.gradle.kts file:
roborazzi {
  generateComposePreviewRobolectricTests {
    enable = true
  }
}
The plugin will not automatically change your settings or add dependencies to prevent conflicts with your existing setup. However, it will provide instructions on what to do next, such as adding dependencies and required code. You can also check the sample project for a complete example.
After that, you can run the recordRoborazziDebug task to generate screenshots using the generated tests, as described in the setup guide.
You can customize the generated test by adding the following configuration to your build.gradle.kts file:
roborazzi {
  @OptIn(ExperimentalRoborazziApi::class)
  generateComposePreviewRobolectricTests {
    enable = true
    // The package names to scan for Composable Previews.
    packages = listOf("com.example")
    // robolectricConfig will be passed to Robolectric's @Config annotation in the generated test class.
    // See https://robolectric.org/configuring/ for more information.
    robolectricConfig = mapOf(
      "sdk" to "[32]",
      "qualifiers" to "RobolectricDeviceQualifiers.Pixel5",
    )
    // If true, the private previews will be included in the test.
    includePrivatePreviews = true
    // The fully qualified class name of the custom test class that implements [com.github.takahirom.roborazzi.ComposePreviewTester].
    testerQualifiedClassName = "com.example.MyCustomComposePreviewTester"
    // The number of test classes to generate. Set this to match maxParallelForks for parallel test execution.
    generatedTestClassCount = 4

    // Experimental: render at a lower density to make the tests faster and the images smaller.
    // See "Making the tests faster with renderScale" below.
    // renderScale = 1.0 / 3

    // Filter previews by annotation. See "Filtering previews by annotation" below.
    annotationFilter = AnnotationFilter.Filter.RoboPreviewInclude
  }
}You can create a custom ComposePreviewTester to control the screenshot capture behavior, such as setting a custom image comparison threshold.
Note that AndroidComposePreviewTester is a final class, so you can't subclass it. Instead, use Kotlin class delegation and pass a custom Capturer to its constructor. Also, your tester class must have a parameterless constructor because the plugin instantiates it via reflection:
import com.dropbox.differ.SimpleImageComparator
import com.github.takahirom.roborazzi.*
import com.github.takahirom.roborazzi.ComposePreviewTester.TestParameter.JUnit4TestParameter.AndroidPreviewJUnit4TestParameter

@OptIn(ExperimentalRoborazziApi::class)
class MyCustomComposePreviewTester :
  ComposePreviewTester<AndroidPreviewJUnit4TestParameter> by AndroidComposePreviewTester(
    capturer = { parameter ->
      val customOptions = parameter.roborazziOptions.copy(
        compareOptions = parameter.roborazziOptions.compareOptions.copy(
          // Set custom comparison threshold (0.0 = exact match, 1.0 = ignore differences)
          imageComparator = SimpleImageComparator(maxDistance = 0.01f)
        )
      )
      AndroidComposePreviewTester.DefaultCapturer().capture(
        parameter.copy(roborazziOptions = customOptions)
      )
    }
  )
If you need to customize more than the capture behavior, such as the scan options or the test lifecycle, you can override options() or test() in the delegating class.
Options is how the Gradle extension reaches your tester: the generated test assigns the configured values to ComposePreviewTester.defaultOptionsFromPlugin, and the default options() returns them. So when you override options(), derive the result with super.options().copy(...) instead of constructing a new Options, otherwise every setting the plugin configured is silently replaced by defaults. The same applies if you implement test() or the capture yourself: read the values from options() rather than assuming defaults.
Two settings need extra care with a custom tester:
includePrivatePreviews and annotationFilter are consumed by testParameters(). Because a custom tester usually overrides it, the plugin rejects the combination unless you set useScanOptionParametersInTester = true and read options().scanOptions yourself.renderScale (see Making the tests faster with renderScale) is consumed at capture time, so the class-delegation pattern above keeps working. If you override test() yourself, see the renderScale property documentation for what to pass to preview.toRoborazziComposeOptions(renderScale). A tester that drops the value fails the generated test with an explanation, so a silently unscaled screenshot is not possible.Then reference your custom tester in the Gradle configuration:
roborazzi {
  @OptIn(ExperimentalRoborazziApi::class)
  generateComposePreviewRobolectricTests {
    enable = true
    testerQualifiedClassName = "com.example.MyCustomComposePreviewTester"
  }
}
[!NOTE] If you are using Groovy DSL instead of Kotlin DSL, you need to use the set method for each assignment:
generateComposePreviewRobolectricTests.enable.set(true)
generateComposePreviewRobolectricTests.packages.set(["com.example"])
If the generated tests are slow or the recorded images are large, renderScale is the knob for it.
A value below 1.0 renders every preview at a lower device density, so fewer pixels are rendered:
the tests spend less time rendering and the images take less space. What you pay for it is
fidelity, so it pays off on previews that stay readable at the smaller size.
What the scale does and does not change — density-qualified resources, raw-pixel drawing, the dpi
rounding, when it is applied — is documented on the renderScale property itself, which your IDE
shows as you type it.
renderScale is not the same as resizeScale:
| Property | When it applies | What it changes |
|---|---|---|
renderScale |
Before Compose renders | Device density. Logical dp dimensions are preserved, so a smaller surface is rendered. Density-qualified resources (drawable-hdpi and so on) may resolve differently. |
resizeScale (RoborazziOptions.RecordOptions, roborazzi.record.resizeScale) |
After the screenshot is captured | Downsamples the captured bitmap. Rendering cost is unchanged. |
Both change the recorded image dimensions at the same output paths, so existing golden images have to be recorded again after you set either of them.
In the Groovy DSL, write the value as a double literal: renderScale = 0.5d. A bare 0.5 is a BigDecimal and fails to convert.
To scale a single preview differently, annotate it with @RoboComposePreviewOptions(renderScale = ...). This is useful when only a few previews are large enough to be worth the loss of fidelity:
@RoboComposePreviewOptions(renderScale = 0.5)
@Preview(device = "spec:width=1280dp,height=800dp,dpi=240")
@Composable
fun TabletPreview() {
}
Previews without the annotation keep the scale configured in the Gradle extension.
annotationFilter controls which previews are captured (requires the roborazzi-annotations dependency).
By default it is AnnotationFilter.Filter.RoboPreviewExclude, so previews annotated with
@RoboPreviewExclude are skipped. Set it to RoboPreviewInclude to capture only previews
annotated with @RoboPreviewInclude:
roborazzi {
  @OptIn(ExperimentalRoborazziApi::class)
  generateComposePreviewRobolectricTests {
    enable = true
    packages = listOf("com.example")
    annotationFilter = AnnotationFilter.Filter.RoboPreviewInclude
  }
}
To filter by your own annotations, pass their fully qualified class names
(use the JVM binary name with $ for nested classes, e.g. com.example.Outer$Inner):
// Set either one, not both
annotationFilter = AnnotationFilter.Exclude("com.example.MyExcludeAnnotation")
annotationFilter = AnnotationFilter.Include("com.example.MyIncludeAnnotation")The Compose Preview support also works with Compose Multiplatform common previews (@Preview in commonMain). You can scan them with the CommonComposablePreviewScanner from the ComposablePreviewScanner common artifact in a custom tester; the generated tests run as Android unit tests with Robolectric. See the multiplatform sample project for a complete setup.
Roborazzi can also generate preview screenshot tests for the Compose Desktop (JVM)
target, without Robolectric. Previews are scanned with ComposablePreviewScanner's
android artifact, which is a pure-JVM jar: it finds the multiplatform
androidx.compose.ui.tooling.preview.Preview annotation on the classpath, so previews
declared in commonMain are captured too.
jvm()
target or a plain org.jetbrains.kotlin.jvm project. For an Android-only project
that means a KMP migration first — stick with the Robolectric preview tests there.
Desktop tests shine for already-multiplatform code and Desktop-only apps.Enable it in your build.gradle.kts:
roborazzi {
  @OptIn(ExperimentalRoborazziApi::class)
  generateComposePreviewDesktopTests {
    enable = true
    packages = listOf("com.example")
    // Required only when the project has multiple Kotlin JVM targets:
    // targetName = "desktop"
  }
}
Add the dependencies to the JVM target's test source set. If your previews use the
Roborazzi marker annotations (@RoboPreviewExclude, @RoboComposePreviewOptions, ...),
also add roborazzi-annotations to the source set that declares the previews
(usually commonMain — test dependencies do not flow into main source sets):
kotlin {
  sourceSets {
    val commonMain by getting {
      dependencies {
        // Only needed when previews use the Roborazzi marker annotations
        implementation("io.github.takahirom.roborazzi:roborazzi-annotations:[version]")
      }
    }
    val desktopTest by getting {
      dependencies {
        implementation("io.github.takahirom.roborazzi:roborazzi-compose-desktop-preview-scanner-support:[version]")
        implementation("io.github.sergio-sastre.ComposablePreviewScanner:android:[version]")
        implementation("junit:junit:4.13.2")
      }
    }
  }
}
Plain JVM projects (org.jetbrains.kotlin.jvm) are also supported: add the same
dependencies with testImplementation(...) and use the Jvm task names
(recordRoborazziJvm, compareRoborazziJvm, verifyRoborazziJvm).
Then run the desktop Roborazzi tasks:
./gradlew recordRoborazziDesktop
./gradlew compareRoborazziDesktop
./gradlew verifyRoborazziDesktop
Note: ComposablePreviewScanner is published with JVM 17 metadata, so the desktop
target needs to target JVM 17 (or relax the test classpath's TargetJvmVersion
attribute). See the desktop multiplatform sample
for a complete setup, including manual usage of the tester API without the generator.
Desktop preview screenshots use the same file names as the Robolectric preview tests
(fully qualified class name + method name + preview parameter suffix), so the same
preview produces the same file name on both platforms. If one module enables both
generateComposePreviewRobolectricTests and generateComposePreviewDesktopTests, the
two sets of screenshots would overwrite each other in the shared output directory, so
Roborazzi fails with a configuration error unless
separateOutputDirs
is enabled, which gives each task its own subdirectory.
DefaultDesktopComposePreviewTester accepts a Capturer whose receiver is the raw
ComposeUiTest scope, so anything possible inside runDesktopComposeUiTest — clock
control, interactions, wrapping the content in a theme — stays possible:
@OptIn(ExperimentalRoborazziApi::class, ExperimentalTestApi::class)
class MyDesktopPreviewTester : DesktopComposePreviewTester by DefaultDesktopComposePreviewTester(
  capturer = DefaultDesktopComposePreviewTester.Capturer { parameter ->
    setContent { MyTheme { parameter.preview() } }
    // Keep @RoboComposePreviewOptions manualClockOptions working: without this,
    // time-suffixed captures would all show the initial state.
    advanceMainClockFor(parameter)
    onRoot().captureRoboImage(parameter.filePath, parameter.roborazziOptions)
  }
)
Reference your tester in the Gradle configuration with
testerQualifiedClassName = "com.example.MyDesktopPreviewTester" (the class needs a
parameterless constructor). If you need to change scanning or file naming as well,
implement DesktopComposePreviewTester by delegating to the default tester and
override the corresponding method (testParameters() / test()).
To wrap each generated test in a JUnit TestRule (a TestWatcher, retry rule, etc.),
override options() and provide a testRuleFactory:
@OptIn(ExperimentalRoborazziApi::class, InternalRoborazziApi::class)
class MyDesktopPreviewTester : DesktopComposePreviewTester by DefaultDesktopComposePreviewTester() {
  override fun options(): DesktopComposePreviewTester.Options =
    DesktopComposePreviewTester.defaultOptionsFromPlugin.copy(
      testLifecycleOptions = DesktopComposePreviewTester.Options.JUnit4TestLifecycleOptions(
        testRuleFactory = { MyWatcherRule() }
      )
    )
}
Unlike the Robolectric tester there is no compose rule factory: Compose Desktop's test
harness is function-scoped (runDesktopComposeUiTest), not rule-based.
| Feature | Android (Robolectric) | Compose Desktop |
|---|---|---|
| Generated preview tests | ✅ | ✅ |
packages, includePrivatePreviews, testerQualifiedClassName, generatedTestClassCount
|
✅ | ✅ |
annotationFilter (@RoboPreviewInclude / @RoboPreviewExclude) |
✅ | ✅ |
@PreviewParameter (PreviewParameterProvider, one capture per value) |
✅ | ✅ |
@RoboComposePreviewOptions (manualClockOptions, one test per variation) |
✅ | ✅ |
Custom JUnit TestRule around generated tests (testRuleFactory) |
✅ | ✅ |
Compose rule factory (composeRuleFactory) |
✅ | Not applicable (function-scoped harness) |
@Preview annotation options (widthDp/heightDp, fontScale, showBackground/backgroundColor, locale, uiMode dark bit) |
✅ (see below) | ✅ |
@Preview(device = ...) |
✅ | Not applicable (no device configuration on desktop) |
robolectricConfig (device qualifiers, SDK) |
✅ | Not applicable |
On Compose Desktop the @Preview annotation options are applied as follows:
widthDp/heightDp: the preview is wrapped in a fixed-size box (density is 1, so 1dp equals 1px). When neither is specified the preview still renders wrap-content.fontScale: applied through LocalDensity (density stays 1), because DeviceConfigurationOverride.FontScale is unsupported on desktop.showBackground/backgroundColor: draws a background behind the preview, defaulting to white when showBackground = true but no color is given.locale: sets java.util.Locale.getDefault() for the capture and restores it afterwards. Accepts "ja", "ja-rJP", and "ja-JP" forms.uiMode: only the night bit is honored (dark mode via LocalSystemTheme); other configuration bits are ignored.device: not applicable, as desktop has no device configuration.To enable fine-grained control over screenshot timing in Compose Previews, add the annotations dependency:
testImplementation("io.github.takahirom.roborazzi:roborazzi-annotations:[version]")Use @RoboComposePreviewOptions to configure time-based captures:
@RoboComposePreviewOptions(
  manualClockOptions = [ManualClockOptions(advanceTimeMillis = 516L)]
)
@Preview
@Composable
fun DelayedPreview() {
  var visible by remember { mutableStateOf(false) }
  LaunchedEffect(Unit) {
    delay(500)
    visible = true
  }
  if (visible) {
    Text("Content appears after 500ms")
  }
}
This annotation enables capturing screenshots at specific time intervals, particularly useful for testing animated components or delayed state changes.
Previews annotated with @PreviewWrapper (Compose UI 1.11+) are automatically wrapped by ComposablePreviewScanner 0.9.0 or later, so the wrapper's content, such as a theme or background, appears in the screenshots without any extra setup:
class MyWrapperProvider : PreviewWrapperProvider {
  @Composable
  override fun Wrap(content: @Composable () -> Unit) {
    MyTheme { content() }
  }
}

@PreviewWrapper(MyWrapperProvider::class)
@Preview
@Composable
fun WrappedPreview() { ... }Roborazzi provides a helper function for ComposablePreviewScanner. You can add the following dependency to your project to use the helper function:
testImplementation("io.github.takahirom.roborazzi:roborazzi-compose-preview-scanner-support:[version]")
Then you can use the ComposablePreview<AndroidPreviewInfo>.captureRoboImage() function to capture the Composable Preview using the settings in Preview annotations.
To obtain the ComposablePreview object, please refer to ComposablePreviewScanner.
fun ComposablePreview<AndroidPreviewInfo>.captureRoboImage(
  filePath: String,
  roborazziOptions: RoborazziOptions
)Currently, we don't support all the annotation options provided by the Compose Preview. You can check the supported annotations in the source code. We are looking forward to your contributions to support more annotation options.
Roborazzi supports AI-powered image assertion. AI-powered image assertion is an experimental feature. Screenshot tests are a great way to verify your app's UI, but verifying the content of the images can be a tedious and time-consuming task. This manual effort reduces scalability. Roborazzi can help automate this process through AI-powered image assertion, making it more efficient and scalable.
There are two library modules: io.github.takahirom.roborazzi:roborazzi-ai-gemini and io.github.takahirom.roborazzi:roborazzi-ai-openai for AI-powered image assertion.
roborazzi-ai-gemini leverages Gemini and generative-ai-kmp, while roborazzi-ai-openai utilizes the OpenAI API through raw HTTP API calls implemented with Ktor and KotlinX Serialization
...
@get:Rule
val composeTestRule = createAndroidComposeRule<MainActivity>()

@get:Rule
val roborazziRule = RoborazziRule(
  options = RoborazziRule.Options(
    roborazziOptions = RoborazziOptions(
      compareOptions = RoborazziOptions.CompareOptions(
        aiAssertionOptions = AiAssertionOptions(
          aiAssertionModel = GeminiAiAssertionModel(
            // DO NOT HARDCODE your API key in your code.
            // This is an example passing API Key through unitTests.all{ environment(key, value) }
            apiKey = System.getenv("gemini_api_key") ?: ""
          ),
        )
      )
    )
  )
)

@Test
fun captureWithAi() {
  ROBORAZZI_DEBUG = true
  onView(ViewMatchers.isRoot())
    .captureRoboImage(
      roborazziOptions = provideRoborazziContext().options.addedAiAssertions(
        AiAssertionOptions.AiAssertion(
          assertionPrompt = "it should have PREVIOUS button",
          requiredFulfillmentPercent = 90,
        ),
        AiAssertionOptions.AiAssertion(
          assertionPrompt = "it should show First Fragment",
          requiredFulfillmentPercent = 90,
        )
      )
    )
}AI-Powered Image Assertion runs only when the images are different. If the images are the same, AI-Powered Image Assertion is skipped.
This is because AI-Powered Image Assertion can be slow and expensive.
You can use manual image assertion with Roborazzi. This allows you to utilize local LLMs or other LLMs. Manual Image Assertion doesn't require adding any dependencies other than Roborazzi itself.
You must provide the AiAssertionModel to RoborazziOptions to use manual image assertion.
interface AiAssertionModel {
  fun assert(
    referenceImageFilePath: String,
    comparisonImageFilePath: String,
    actualImageFilePath: String,
    aiAssertionOptions: AiAssertionOptions
  ): AiAssertionResults

  fun assert(
    targetImages: TargetImages,
    aiAssertionOptions: AiAssertionOptions
  ): AiAssertionResults
}
compareOptions = RoborazziOptions.CompareOptions(
aiAssertionOptions = AiAssertionOptions(
aiAssertionModel = object : AiAssertionOptions.AiAssertionModel {
override fun assert(
referenceImageFilePath: String,
comparisonImageFilePath: String,
actualImageFilePath: String,
aiAssertionOptions: AiAssertionOptions
): AiAssertionResults {
// You can use any LLMs here to create AiAssertionResults
return AiAssertionResults(
aiAssertionResults = aiAssertionOptions.aiAssertions.map { assertion ->
AiAssertionResult(
assertionPrompt = assertion.assertionPrompt,
fulfillmentPercent = 100,
requiredFulfillmentPercent = assertion.requiredFulfillmentPercent,
failIfNotFulfilled = assertion.failIfNotFulfilled,
explanation = "This is a manual test.",
)
}
)
}
override fun assert(
targetImages: TargetImages,
aiAssertionOptions: AiAssertionOptions
): AiAssertionResults {
// targetImages.images holds the images to assert (e.g. targetImages.images.first().filePath)
return AiAssertionResults(
aiAssertionResults = aiAssertionOptions.aiAssertions.map { assertion ->
AiAssertionResult(
assertionPrompt = assertion.assertionPrompt,
fulfillmentPercent = 100,
requiredFulfillmentPercent = assertion.requiredFulfillmentPercent,
failIfNotFulfilled = assertion.failIfNotFulfilled,
explanation = "This is a manual test.",
)
}
)
}
},
aiAssertions = listOf(
AiAssertionOptions.AiAssertion(
assertionPrompt = "it should have PREVIOUS button",
requiredFulfillmentPercent = 90,
),
),
)
)
...https://plugins.jetbrains.com/plugin/24561-roborazzi
Demo of Roborazzi IntelliJ IDEA and Android Studio Plugin.
https://github.com/takahirom/roborazzi/assets/1386930/bd3e8106-1971-4ec4-b764-3f1831999228
The Roborazzi plugin enhances your development workflow by automatically displaying screenshots related to Roborazzi's screenshot tests within IntelliJ IDEA. Easily view and verify visual outputs directly in your IDE, streamlining your testing and development process.
Roborazzi supports Compose Multiplatform iOS. You can use Roborazzi with Compose iOS as follows:
Gradle settings
plugins {
  kotlin("multiplatform")
  id("org.jetbrains.compose")
  id("io.github.takahirom.roborazzi")
}

kotlin {
  sourceSets {
    ...
    val appleTest by getting {
      dependencies {
        implementation("io.github.takahirom.roborazzi:roborazzi-compose-ios:[version]") // Use 1.13.0 or higher
        implementation(kotlin("test"))
      }
    }
  ...
Test with Roborazzi
class IosTest {
  @OptIn(ExperimentalTestApi::class)
  @Test
  fun test() {
    runComposeUiTest {
      setContent {
        MaterialTheme {
          Column {
            Button(onClick = { }) {
              Text("Hello World")
            }
            Box(
              modifier = Modifier
                .background(Color.Red.copy(alpha = 0.5f), MaterialTheme.shapes.small)
                .size(100.dp),
            )
          }
        }
      }
      // iOS uses the same RoborazziOptions as the other targets. For example,
      // allow up to 1% of pixels to differ before a comparison fails.
      val roborazziOptions = RoborazziOptions(
        compareOptions = RoborazziOptions.CompareOptions(changeThreshold = 0.01F),
      )
      // Unlike the JVM, iOS has no automatic file-name generation, so filePath
      // is required for every capture.
      onRoot().captureRoboImage(this, filePath = "ios.png", roborazziOptions = roborazziOptions)
      onNodeWithText("Hello World").captureRoboImage(
        this,
        filePath = "ios_button.png",
        roborazziOptions = roborazziOptions,
      )
    }
  }
}
Then, you can run the Gradle tasks for iOS Support, just like you do for Android Support.
./gradlew recordRoborazzi[SourceSet]
./gradlew recordRoborazziIosSimulatorArm64
./gradlew compareRoborazziIosSimulatorArm64
./gradlew verifyRoborazziIosSimulatorArm64
...
The currently implemented features for iOS support are as follows:
| Feature | status |
|---|---|
| Record | supported |
| Compare | supported |
| Verify | supported |
| Report | supported |
| Dropbox/Differ comparison | supported |
| threshold / resultValidator | supported |
| diffPercentage | supported |
| resizing image (resizeScale) | supported |
| context data | supported (user-supplied only; the automatically-added default context data such as the test class name is JVM-only) |
| custom reporter | supported |
| ComparisonStyle | supported (Simple and Grid; Grid falls back to Simple when the density is unavailable) |
| RoborazziRecordFilePathStrategy | 🆖 (filePath is required; a relative path always resolves against the output directory) |
| automatic file naming | 🆖 (filePath is required) |
| image format | PNG only (WebP encoding is not supported on iOS) |
| pixelBitConfig | 🆖 (Rgb565 falls back to Argb8888 with a warning; CoreGraphics has no 5-6-5 format) |
| dump | n/a (Robolectric-only concept) |
| applyDeviceCrop | n/a (Robolectric-only concept) |
UI tree dump JSON sidecar (uiTreeDumpOptions) |
supported (record writes MyTest.uitree.json next to the golden; compare/verify writes MyTest_actual.uitree.json in the compare output directory — the same _actual basename contract as the other platforms) |
UI tree annotated image (annotateImage) |
supported (drawn with UIKit/CoreGraphics; MyTest.annotated.png / MyTest_actual.annotated.png, matching the Android/Desktop look) |
Note on translucent pixels: the iOS canvas stores pixels premultiplied (a CoreGraphics constraint), so translucent colors lose precision proportional to
255 / alpha(opaque pixels are lossless). The loss is deterministic, so comparing identically-produced images is unaffected; only cross-source comparisons of low-alpha content may need a small threshold.
iOS runs on the same shared pipeline as the JVM and Compose Desktop targets
(RoborazziOptions → processOutputImageAndReport → RoboCanvas), so the image
comparator, threshold / resultValidator, resizeScale, context data, custom
reporters, and the reference | diff | new comparison output (including
ComparisonStyle.Grid) all behave the same way. A few platform-specific
features remain unsupported (see the table above); contributions are welcome.
Roborazzi supports Compose Desktop. You can use Roborazzi with Compose Desktop as follows:
Gradle settings
plugins {
  kotlin("multiplatform")
  id("org.jetbrains.compose")
  id("io.github.takahirom.roborazzi")
}

kotlin {
  // You can use your source set name
  jvm("desktop")
  sourceSets {
    ...
    val desktopTest by getting {
      dependencies {
        implementation("io.github.takahirom.roborazzi:roborazzi-compose-desktop:[version]") // Use 1.6.0-alpha-2 or higher
        implementation(kotlin("test"))
      }
    }
    ...
Test target Composable function
@Composable
fun App() {
  var text by remember { mutableStateOf("Hello, World!") }

  MaterialTheme {
    Button(
      modifier = Modifier.testTag("button"),
      onClick = {
        text = "Hello, Desktop!"
      }) {
      Text(
        style = MaterialTheme.typography.h2,
        text = text
      )
    }
  }
}
Test with Roborazzi
class MainKmpTest {
  @OptIn(ExperimentalTestApi::class)
  @Test
  fun test() = runDesktopComposeUiTest {
    setContent {
      App()
    }
    val roborazziOptions = RoborazziOptions(
      recordOptions = RoborazziOptions.RecordOptions(
        resizeScale = 0.5
      ),
      compareOptions = RoborazziOptions.CompareOptions(
        changeThreshold = 0F
      )
    )
    onRoot().captureRoboImage(roborazziOptions = roborazziOptions)

    onNodeWithTag("button").performClick()

    onRoot().captureRoboImage(roborazziOptions = roborazziOptions)
  }
}
Then, you can run the Gradle tasks for Desktop Support, just like you do for Android Support.
./gradlew recordRoborazzi[SourceSet]
./gradlew recordRoborazziDesktop
./gradlew compareRoborazziDesktop
./gradlew verifyRoborazziDesktop
...
If you use the Kotlin JVM plugin, the task will be recordRoborazzi**Jvm**.
Compose Desktop has full UI tree dump
support: enabling uiTreeDumpOptions (or -Proborazzi.dumpUiTree=true) on a
SemanticsNodeInteraction.captureRoboImage writes both the MyTest.uitree.json
sidecar and (by default) the annotated MyTest.annotated.png, with the same
naming and _actual basename semantics as Android.
The sample image
You can configure the following options in your gradle.properties file.
You can also use -P to set the options in the command line. For example, ./gradlew test -Proborazzi.test.record=true.
This option enables you to configure the behavior of Roborazzi. By default, all settings are set to false. For the tasks these properties correspond to, see Build setup.
roborazzi.test.record=true
# roborazzi.test.compare=true
# roborazzi.test.verify=trueThis option lets you set the resize scale for the image being recorded. The default value is 1.0.
roborazzi.record.resizeScale=0.5This setting allows you to specify the file path strategy for the recorded image. The default strategy is relativePathFromCurrentDirectory. If you choose relativePathFromRoborazziContextOutputDirectory, the file will be saved in the output directory specified by roborazzi.outputDir.
roborazzi.record.filePathStrategy=relativePathFromRoborazziContextOutputDirectoryThis option enables you to define the naming strategy for the recorded image. The default strategy is testPackageAndClassAndMethod.
testPackageAndClassAndMethod, the file name will be com.example.MyTest.testMethod.png.escapedTestPackageAndClassAndMethod, the file name will be com_example_MyTest.testMethod.png.testClassAndMethod, the file name will be MyTest.testMethod.png.testPackageDirAndClassAndMethod, the file will be saved as com.example/MyTest.testMethod.png (the package becomes a single directory level).testNestedPackageDirAndClassAndMethod, the file will be saved as com/example/MyTest.testMethod.png (the package becomes nested directories).roborazzi.record.namingStrategy=testClassAndMethodThis option allows you to clean up old screenshots. By default, this option is set to false. The reason why Roborazzi does not delete old screenshots by default is that Roborazzi doesn't know if you are running filtered tests or not. If you are running filtered tests, Roborazzi will delete the screenshots that are not related to the current test run.
roborazzi.cleanupOldScreenshots=trueThis option enables the UI tree dump (JSON).
When set to true, each captured screenshot gets a machine-readable
.uitree.json sidecar written next to the image it describes
(MyTest.uitree.json on record, MyTest_actual.uitree.json on compare/verify).
By default this option is set to false. The sidecar is informational only: it
never participates in image diffing and never fails verification.
roborazzi.dumpUiTree=trueI recommend setting it.systemProperties["robolectric.pixelCopyRenderMode"] = "hardware" in your build.gradle file to enhance the accuracy of your screenshots. For more details, please refer to the issue.
android {
    testOptions {
    ...
        unitTests {
            isIncludeAndroidResources = true
            isReturnDefaultValues = true
            all {
                it.systemProperties["robolectric.pixelCopyRenderMode"] = "hardware"
            }
        }
    }
}A: To run only screenshot tests, you can configure your project with the following:
android {
    testOptions {
        unitTests {
            all {
                // -Pscreenshot to filter screenshot tests
                it.useJUnit {
                    if (project.hasProperty("screenshot")) {
                        includeCategories("io.github.takahirom.roborazzi.testing.category.ScreenshotTests")
                    }
                }
            }
        }
    }
}
Include the -Pscreenshot property, and only the screenshot tests will be run.
Note: This feature is not provided in the Roborazzi library itself, to keep it simple and utilize JUnit's built-in features for test filtering.
You can also annotate your tests like this:
/**
 * You can filter ScreenshotTests using -Pscreenshot parameter
 */
interface ScreenshotTests

@Test
@Category(ScreenshotTests::class)
fun checkLaunchShot() {
  onRoot().captureRoboImage(roborazziOptions = roborazziOptions)
}
This allows you to create a category of screenshot tests and filter them using the -Pscreenshot property, thus making it easier to run only those specific tests.
A: To execute screenshot tests using Android Studio's Run button, configure your project as follows:
gradle.properties
roborazzi.test.record=trueAfter that, you can execute screenshot tests using either Android Studio's Run or Debug button as you normally would.
A: If your screenshot tests are not capturing images, there may be several patterns that are causing this issue. Please follow these troubleshooting steps:
ROBORAZZI_DEBUG = true to see logs.recordRoborazziDebug task is running.captureRoboImage() is being called.A: As of now, there is no direct support for running Roborazzi with Bazel. However, it is possible to do so. Please refer to the following comment for more details: Roborazzi Bazel Support Comment
A: The behavior you are experiencing may be related to caching issues. Although it's
experimental, you can set the outputDir parameter in your build.gradle file to handle caching
and improve the stability of your tests. This parameter allows you to specify the output directory
for your screenshots, which can help in managing the cache. Here is how you can set it up:
If you use the default output directory(module/build/outputs/roborazzi), specifying the outputDir
parameter is not necessary. For more reference, you can check
out the issue.
roborazzi {
    outputDir = "src/your/screenshot/folder"
}
If the caching problems appear when several Roborazzi test tasks run in a single
Gradle invocation (for example check or Kotlin Multiplatform's allTests), the tasks
may be racing over the shared output directory. In that case you can enable the
experimental separateOutputDirs option so each variant/target gets its own directory.
See Separate output directories per variant/target.
A: This is a known issue caused by variations in how graphics libraries render components on different platforms. As we've seen with Now in Android, there are no guarantees for identical rendering across all environments. To ensure more consistent results, consider configuring your continuous integration (CI) environment to both record and test screenshots. This setup minimizes discrepancies by using the same settings and resources for all tests.
A: First, please check if you are using the correct version of the Android SDK. Consider using API level 28 or higher because it seems that Robolectric Native Graphics doesn't work properly on older SDK versions.
You can specify the SDK version like @Config(sdk = [33]) or by using robolectric.properties with sdk=33.
https://robolectric.org/configuring/
If your images are mostly fine but there are some drawing issues like shadows or shape graphics, you can try using Robolectric's Hardware Rendering mode. Please refer to this issue.
A: You may solve this by using unitTests.maxHeapSize to adjust the unit test heap size as follows:
android {
  ...
  testOptions {
    unitTests.all {
      maxHeapSize = "4096m"
    }
  }
}
It is discussed in this issue. Additionally, it might be worth trying to run your tests with VisualVM to monitor memory usage and identify potential leaks.
A: It is discussed in this issue.
To enable the display of Roborazzi tasks, please enable Configure all Gradle tasks during Gradle Sync (this can make Gradle Sync slower) in the Settings | Experimental | Gradle.
Copyright 2023 takahirom
Copyright 2019 Square, Inc.
Copyright The Android Open Source Project

Licensed under the Apache License, Version 2.0 (the "License");
you may not use this file except in compliance with the License.
You may obtain a copy of the License at

   http://www.apache.org/licenses/LICENSE-2.0

Unless required by applicable law or agreed to in writing, software
distributed under the License is distributed on an "AS IS" BASIS,
WITHOUT WARRANTIES OR CONDITIONS OF ANY KIND, either express or implied.
See the License for the specific language governing permissions and
limitations under the License.